
Each skill you learn has corollaries that you may or may not choose to explore. I don’t like the look of needle tatting, so despite being an advanced shuttle tatter I’m barely competent at it. Ditto most of the specifically woolen crochet techniques. I concentrated on shuttle tatting and thread crochet because those were what I liked best – I’m a lace addict, remember? In the same way, knitting is about a great deal more than lace. There are color work, slipped stitches and texture stitches, among other things. An expert lace-knitter may have to really work at Fair Isle or entrelac knitting, and may have no interest in felting whatsoever until her grand-daughter requests a felted hat!
Yet everything we do builds on the experiences that have come before. I wouldn’t find knitting shapes relatively simple if I hadn’t done years of crochet, garment sewing and hand weaving. I might not understand the structure of knitted lace nearly so easily if not for all the other lace experience I’ve gained through the years in all those other lace methods, including a little bit of bobbin and needle lace.
Let’s face it – lace is, at bottom, simply empty (negative) space surrounded by filled (positive) space. Holes in some sort of a background. When those holes are arranged in a deliberate pattern, they’re called lace. How the holes are formed is specific to each technique. In tatting the holes are surrounded by rings or picots or chains. In crochet, holes are usually formed by some variation of chain stitch. In weaving, holes are made by gathering threads together and using the weave structure to lock them in place around the hole. In knitting, holes are generally formed by yarn-overs.
Because of the utter simplicity of its hole formation, knitted lace is the most potentially complex of the so-called peasant needle laces (more on this term later). Those yarn-over holes can stand alone, in which case your knitted piece will widen. They can be evenly paired with decreases, in which case the width of your knitted piece will stay pretty much the same. Or yarn-overs can be unevenly paired with decreases, in which case your knitting will either increase or decrease in width, depending on the distribution of the pairing.
A firm grasp of these principles will assist in lace knitting– you’ll be able to analyze a lace pattern and see why it’s knitting up as it is. Lace edgings make excellent use of this, increasing one stitch every row or two to a specified point, then decreasing one stitch every row or two back to the starting width. Corollaries of this principle can be used to form undulating edges on knitted pieces.
Lace can be chosen as a knitting structure for a variety of reasons. Perhaps you need a piece of variable utility. You’re going to be traveling and will need a shawl for this occasion, but an afghan would really be nice for huddling by the fire at the next destination. It also makes a nice portable change house when you drop your lunch down your shirt-front. Or perhaps you want to make a special gift for a young lady. A square or round lace shawl would be nice for a shoulder wrap for formal or informal occasions, could be used over a bridal gown or going-away ensemble, and be stored for later use as a christening shawl. That same shawl can also be used as an afghan for a hospital stay or a wall decoration for a new house. For that matter, that first travel shawl can be used for all of those things!
Maybe you need something that can vary in size a good bit. You want a nice three-season sweater, and have just started a diet or learned of a pregnancy. A lace design can ‘grow’ or ‘shrink’ with blocking quite a bit more than a stockinette or color-stranded one.
Whatever the reason you choose to make your first lace piece, it will probably not be your last. As noted in the examples given above, lace has a great ability to be utilitarian as well as beautiful. I’m constantly amazed by how often I pick up a shawl and for how many different purposes. And knitting lace is addictive. Watching the pattern grow in a lace design is just as rewarding as watching the colors change and intertwine in color knitting.
Now back to that term – “peasant needle laces”. If you aren’t a student of the history of fiber arts you may not recognize it. Basically, it is a historical term. Yes, it is sometimes used in a derogatory rather than merely descriptive way, usually by rabid bobbin lace fanatics (of whom, luckily, there are fewer each year). But the original historical meaning referred to those laces which could be executed with minimal tools and were thus frequently utilized and manufactured by the lower economic classes of a society.
Many of those laces were not only utilized by the lower economic groups, they were developed by and indeed became a valuable addition to the economy of an otherwise deprived area. The Shetland and Faeroe Islands come immediately to mind, of course, but there were also the southern steppes of Russia and parts of France, Spain and eastern Europe. It is difficult for us today to relate to the value placed on lace during the Middle Ages. Lace was a fashionable and necessary addition to attire (unless legislated otherwise – Google ‘sumptuary laws’ for more information) from around 1000 AD through the middle part of the twentieth century. Lavish displays of beautiful lace showed your supposed financial standing.
Lace has only lost popularity in recent history. And, no cheating now, how many of you ladies have some sort of lace trim on your underclothing right now? Yet machine-made lace is of quite recent origin. Before the 1800’s all lace was of necessity hand-made. And a sign of status well into the twentieth century was to wear or use only handmade lace trims.
Lace making was a respectable and legal means of support for the woman who had no other income or skills. Or for the woman or man who was trying to supplement a meager family income. Perhaps those practitioners were peasants, but they were far from unskilled.
Lace making now is a hobby for most. The rewards are usually less tangible than money, but no less important. We can usually afford to choose our supplies carefully, and our meals are not dependent upon our production. We can take our time, practice and perfect our art to whatever degree we choose. Some decry this, sure that we lose some level of skill by relegating lace making to hobby status. I don’t agree. There have always been varying degrees of skill among lace makers. Some people don’t choose to become experts. Some have always learned the skills involved more easily than others due to either native talent or long practice in other mediums. But everyone can find knitting lace rewarding and pleasurable. The only things you need are a desire to make lace and the patience to study and practice the needed skills. Then you can reap the rewards of a special sort of satisfaction.
Thursday, June 30, 2005
Comments and musings
I belong to several lace-knitting and spinning lists. I also belong to tatting, weaving and crochet lists, which I currently read only sporadically. Like the rest of us, I spend most of my time on the things that interest me most, and right now that’s lace knitting and spinning.
I’ve noticed a common thread among newcomers to all needlework disciplines (more about that word choice later). They tend to ask “What’s the best book to buy to get started?” Luckily, most of them don’t get annoyed when they get a half-dozen or more recommendations for that “best book”. But I always smile a little when I read the question.
The simple truth is that, while decent instructional material is both helpful and necessary, the most essential component for learning a new skill is still practice. (I can hear my mother, grandmother and great-grandmother applauding – they tried to teach me that any number of times, but it didn’t ‘take’ very well on things I didn’t like to do.) I enjoyed reading a response to a variation of that question today on a lace-knitting list. The suggestion was that the new knitter should choose some sport- or fingering-weight yarn and appropriate needles, get a book of charted lace patterns, and simply make swatches for awhile. One included comment was that the new knitter would learn more from that than almost anything else he or she could do. I cheered out loud! Finally, a common-sense approach! I applaud this knitter’s sagacity and courage. Unfortunately, she may not be praised for her advice.
To return to the ‘discipline’ word choice: First, let’s define the word. “Discipline” means several things, and is both a noun and a verb. One meaning of the noun is “a subject or field of activity, for example, an academic subject”. A meaning of the verb form is “to make yourself act or work in a controlled or regular way”. With both of those firmly in mind, take a look at your needlework. I don’t know about you, but I tend to return to something until I feel I’ve mastered it. Some call this persistence, others an obsessive-compulsive disorder. Whichever it is, it’s the way I learn things. I read, study, analyze and practice until I have it.
I love lace with a passion that only a short, middle-aged, Rubenesque woman who looks like an ambulatory lace pillow wearing it could feel. I’ll never master lace in all its forms, but I do now feel a comfortable mastery of crocheted, woven and tatted laces. I can analyze and duplicate any piece I see and like in those mediums, and can design, construct and finish a piece that will look the way I envision. I know which materials to choose and which to avoid, how to manage the technical details of a piece, and how to execute the necessary stitches or tie-ups or whatever. I didn’t learn even most of that from books, although they certainly helped and it would have been much harder without them. I learned most of it from crocheting, tatting and weaving a lot of lace over many years – slightly more than two decades, in fact.
I’m getting there with knitting, but have not quite arrived as yet. I’d call myself an advanced intermediate lace-knitter at this point. I can follow a pattern, analyze components to get a stitch pattern repeat, and use that repeat in a different piece. I can shape a knitted piece into a square, rectangle, circle, tube or triangle and plan the needed increases and decreases in the chosen stitch pattern. I’m comfortable enough with knitting to wing it to some degree and feel confident that I can get myself out of almost anything I get into. I can design pieces within the constraints of the desired finished form – a sweater won’t come out looking like a shawl. But I’m not yet comfortable enough to take a piece I see, analyze and duplicate it without a lot of visits to the frog-pond. So I still have a way to go on knitted lace, and am enjoying the journey.
Most of my tatting, crochet and weaving was learned pre-internet. Yes, Virginia, the internet is brand-new. It’s amazing how quickly it has grown to be a mainstream part of life in so much of the world. In 1990 it was a tool for scientists and the military to communicate via telephone wires and satellite. In 2005 it is an everyday part of business and personal life. That’s 15 short years – less than the life-span of any one of my teenage children. By 2010 nobody is quite sure how the internet will have evolved. But it has changed learning and communications forever.
Because of that recent technological innovation, a new tatter in Australia can talk over problems with tatters anywhere in the world, gaining from their experiences in a more immediate way than ever before. Weavers can get on-line tutorials on everything from designing complex weave structures to basic instruction on choosing and warping a loom. Crocheters and knitters have immediate, 24/7 access to instruction and patterns beyond imagining only ten years ago. Ditto any other discipline you want to name. Words and pictures fly around the world limited only by the speed of the typist and the connection.
This is overall a very good thing, since it immediately gives a knowledgeable support group to a beginner. It also gives invaluable advice to anyone trying to complete any given published pattern, since it’s almost certain that somebody on the queried list will have done that same pattern before. And you have a tremendous pool of expertise and experience if designing a piece in either a new or a familiar medium.
But I have noticed a distressing tendency for people to ‘dabble’ more than ever before. I used to teach various crafts in a retail store. I could, and did, teach people how to use anything the store sold – and they sold a lot of different things! Was I an expert in all of those fields? Nope. But I had an advantage in that I was encouraged to practice with the materials and techniques on company time and at company expense. So I knew quite a bit more than somebody who had just picked up a basic set of supplies for one project. However, I never passed myself off as an expert on matters unless I truly was an expert. My advice was just that, and was always given with the caveat that the purchaser’s experience might be different.
I quickly noticed that I saw a lot of the same faces day after day. I called them the dabblers. They’d try quilting, start (and maybe even finish) a small wall hanging, and then go on to crochet. They’d start (and perhaps finish) a simple afghan and go on to a small piece of ribbon embroidery, then to tole painting, and next to stamping or flower arranging or stained glass or beaded jewelry. They never stayed with one thing long enough to get comfortable or learn even a fraction of its possibilities.
This isn’t a bad thing – it’s called exploration, and I encouraged my children and Girl Scout troops to do a lot of it. You can’t choose to study something in depth if you haven’t experienced at least a little of it. The not-so-good part of a certain type of this adult dabbler is their self-assumed ‘expert’ status on everything they’ve ever tried briefly. “Tatting is terribly difficult” or “quilting is so boring” or “knitting is much harder than crochet” are some of their comments. These opinions are offered as jewels of wisdom. The worst thing about them is the harm they do to those enthusiastic folks who are truly interested in learning a new skill, but give up the idea because of this single opinion.
But let’s get back to this hypothetical new lace knitter. How do you know if you’re writing back to a genuine enthusiast or a dabbler? Answer: you don’t. That’s why I was so happy to see the response I talked about above. Reading a single book or even an entire collection of books will not make anyone an expert lace knitter. You become a competent lace knitter by knitting lace. You become an expert lace knitter by knitting LOTS of lace. There are no shortcuts. The only way you will gain mastery of any skill is with plenteous amounts of practice performed over at the very least several years. Again, there are no shortcuts to mastery. Can study help? Absolutely. Is it a substitute for practice? No way!
Wednesday, June 22, 2005
Update Number 1 on Wedding Veil
So far so good! I have about 10-12 inches of the center done and have just transferred over to a circular needle. The Waterman small leaf pattern is working quite well, and I’ve figured out that I can increase one repeat every 6th row nicely. Forming the increases by substituting a k 2 tog for the sl 1, k2, psso in the first and last repeat of each section is also working quite nicely, and almost invisibly. Pictures will follow...I don't have the knitting with me right now!
I don’t think I made it clear that I’m working in 8 sections from the center out…I’ve been tweaking and fiddling with this to the point where my notes (and brain) are somewhat scattered. My final decision is to use the blog as my record, though. So, daughter of mine, if you’re reading this, you’d better not fuss about my printing out each entry and using that as your record – along with my knitting notes on my worksheets, of course.
Details for those not anxious to follow my previous meanderings: I’m knitting the Treenway Silks 2P size reeled silk on size 2 US needles to make a round shawl for my daughter to wear as a wedding veil. Gauge is working out to between 5 and 6 stitches per inch, depending on the blocking. The veil has a fairly good amount of body, and should hang nicely. The yarn itself has a lot of body, is quite smooth and firmly spun, and stitch definition is quite crisp. Lovely stuff to work with – soft and shiny and, well, silky!
Friday, June 17, 2005
The First Sample
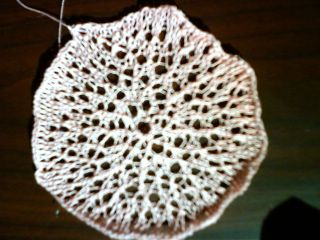
Sample veil center

Here is a sample of the Waterman pattern, with the changes I talked about yesterday. It looks better in person, and I'll try to get a better picture when I locate my camera again - my youngest son cleaned house for me yesterday, and while it looks great, everything has been tidied into the wrong places! And I wasn't going on a camera hunt at 6:00 am - I needed to get to work.
I do think it will not only work, but look really nice. The lace is open enough for her hair to show nicely, and patterned enough to frame her face. The three bind-off rows I did on this sample were plenty to illustrate exactly what I was worried about - a stockinette stitch is just too dense, especially doubled, as a veil would be.
So I think I'm getting there on the design process. Next is to decide just how I want to do the next portion of the design - as a continuous, end-to-end patterned band, or as a series of knots scattered on a stockinette field. And then I'll decide on the edging - right now I'm leaning toward the one in the Gathering of Lace book with the octagonal center section. But we'll see. I feel a little bit better, since I have at least a start! Maybe I can get this done in time...if I get the yarn here, and the design works well, and...
Breathe! Now repeat - I can do this, I can do this, I can do this...
Thursday, June 16, 2005
Blushes and Rants and Musings...Oh, My!
Blushes!
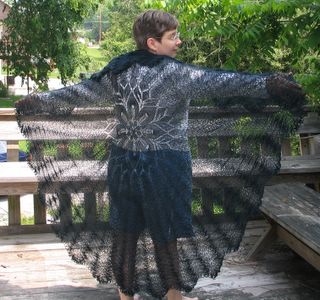
Many thanks to everyone who gave me such enthusiastic comments on the Buegler Feather and Fan Shawl (pictured below). I’ve blushed steadily for over a week now!
I have been asked for some additional details on the yarn; I didn’t spin the alpaca for this one. I was in more of a knitting mood than a spinning mood, and I was already spinning for a couple of other projects (like the wedding veil that’s going to be made from reeled silk after all my work). I had read nice things about KnitPicks Alpaca Cloud yarn in Knitter’s Review, so I wandered over to their website (http://knitpicks.com/ ) and took a look. When I saw that I could buy enough of their Midnight color to make the shawl for less than $25 including shipping, I didn’t even try to resist.
I was slightly disappointed for about a half-second when I opened the yarn, as I was expecting a more blue-colored yarn, but I had opened the box in the early March sunshine – as soon as I realized that it was an iridescent green/blue thread that ran through the black background, and then picked up the yarn, I was in love! I can’t say enough extravagant things about the hand and live feel of this particular yarn. I normally get rather bored with a large project at about the half-way point, and it gets put aside for a few months until I’m ready to work on it again. But the feel of this yarn slipping through my fingers kept me steadily plugging away, and I finished up the shawl in less than three months of spare-time knitting – between two other projects!
Rants!
I got to do one of the things I enjoy most this past weekend – demonstrate spinning in public! I love to teach (as you’ve probably figured out already), and of course, you can’t teach something that nobody knows about! So demonstrating is always fun for me. This weekend was especially nice, since my husband and younger son decided to join me at the Norris Dam State Park Homecoming Festival. Saturday was fairly busy in spite of intermittent rain and cloudy skies, and it was a good thing that the East Tennessee Fiberarts Guild was well-represented – we had 5 spinners and made a good strong showing with my cross-stitching husband and knitting son thrown into the mix.
It was totally great to have my husband and son along. It’s amazing how many closet knitters, weavers, quilters and cross-stitchers are men! They’re frequently the last men you would expect to show interest. We had one motorcyclist quilter, complete with black leather riding gear and tattoos asking questions about dyeing, and a knitter who looked like a wrestler commenting on my son’s knitting, left in a chair while he took a break. Those don’t really surprise me that much anymore, but the welders and machinists and mechanics do. And they never say a word unless there’s another man sitting there doing needlework! I talked with more men this weekend than I’ve done since the last time the ‘guys’ helped out. I’ve never understood men’s shyness about doing needlework…it’s not as if it’s a gender-specific activity!
Before you read this next bit, I’d like to reiterate that I enjoy demonstrating tremendously – I do at least four public demos each year. That said, I always come home wondering at the ignorance of the general population about where their necessities originate! I’m not talking about electronics, but about food and clothing! I know that I had a somewhat unusual childhood in that it spanned two very different worlds. My parents were a part of a very technically-oriented group – employees at the government’s Oak Ridge facilities were cutting-edge in technical matters – while my grandparents were coal-mining small farmers in one of the poorest counties in East Tennessee. But even those of my classmates who were so-called ‘city kids’ knew the realities of where their meat, veggies and clothing came from.
There were still farms in close proximity to Knoxville and Oak Ridge in the 1960’s and 1970’s (in the areas now known as West and Northwest Knoxville), and the family that didn’t grow a vegetable garden in the summer was unusual enough to cause remark. Cotton and linen might not be grown by everyone, but there was still enough around so that you could see what it looked like as you trundled past in the bus on your way to school. And while cows, pigs and chickens were more popular small-farm animals, sheep were not that uncommon. School field trips to farms were not even a topic for conversation – everybody bought truck produce from local farmer’s stands, or picked fruit, beans and tomatoes at various farms when they were ripe and canned or froze the produce. Farms were simply a part of life – not remarkable in any way.
Things have definitely changed. Farms are necessary field trips now, and it requires a 20-30 minute school-bus ride to reach them, even in my so-called rural area. We read stories, shepherd preschool through 3rd-graders through once a year for an hour and expect them to pick up the rudiments of where their clothes and food originate. Let me tell you, it doesn’t work! These children – and their young parents - have no idea where their food comes from other than ‘the grocery store’. Their life experience doesn’t encompass the reality of farming. They only see the neat packaging – never the messy reality of dusty feed and dirty bedding and blood draining into tubs. I’m not sure we’re doing them any favors by removing them from the realities…but mandatory time spent working on a farm brings up mental pictures of the sort of horrors China perpetrated during their Cultural Revolution. The cure is worse than the disease!
The comments at demonstrations have become rather predictable through the years, and the responses are now automatic. “See, that lady’s weaving cloth!” gets the response, “Not quite yet – you have to make the thread or yarn before you can weave the cloth. I’m spinning that yarn now. There are samples of woven and knitted cloth on the table over there.” “They have to kill the sheep to get the wool.” is met with “Farmers would never kill an animal that could bring in ten years worth of money for top-quality wool – they’ll take very good care of it in order to get that money.” “But how do they get the wool?” is responded to with “They give the sheep a haircut – just like you get!” “What holds the thread together?” earns the response “Friction, created by the twist you insert into the fibers, turns a bunch of 3-inch long fibers into hundreds of yards of thread.” “You can buy socks at Walmart for about $1 a pair.” earns a response almost equally rude, but in a very sweet tone – “Yes, I could, but I prefer to keep my hands and mind busy and have something to show for my time.” That one usually takes them at least a few seconds to work out. Then they tend to either wander away with a red face or get belligerent enough to attract Security. In either case they’re out of my hair. Ignorance can be cured with factual information and a little experience, but there is no cure for that sort of rudeness except elimination from the gene pool.
Enough ranting – I have it all out of my system now!
Musings!
I’m working steadily on a design (although at this stage it’s more of a concept) for my daughter’s wedding veil. After much waste of time and drafting paper I’ve decided I can’t modify a square Celtic Knot pattern into an octagon. Maybe a better mathematician could manage it, but I can’t. So this will NOT start with a central Celtic Knot. I’m not sure I’d really like the look of a mostly-solid knit area right around the face, anyway. I think it would be much prettier to have a very fine, lightly-patterned lace netting, and then switch to the mostly stockinette designs at about chin or shoulder level. That way the weight is where it’s needed most to help create the proper drape, and the stockinette won’t hide her hair.
So I’ve decided I’ll start with about 18-24 inches in 3x3 Leaf Stitch from the Waterman book (Traditional Knitted Lace Shawls, Martha Waterman, Interweave Press). That should be easy to increase properly from a center beginning. The rate of increase is going to be 2 stitches in each of 8 sections every other round, which matches the 2 stitches in each 16 sections every 4th round rate of increase recommended for circular shawls – either way you’ll get a total of 32 stitches increased after every 4th row. And if I begin with 6 stitches, I can start the pattern on the 5th row - this way:
Row 1: Knit the 6 cast-on stitches
Row 2: Knit 1, yo, and repeat around for a total of 12 stitches (6 increases)
Row 3: Knit around
Row 4: Knit 1, yo, and repeat around for a total of 24 stitches (12 increases)
Row 5: Begin pattern Row 1.
Hopefully this isn’t too rapid a rate of increase – I’ll try it tonight and make sure. But I do want to get the pattern started as soon as possible. I know we aren’t going to be folding it exactly in the middle (you definitely want the top layer shorter than the bottom one), but I want that central increase section to be as minimal as possible. It will take 6 rows from Row 5 to get the other 4 pattern repeats incorporated (48 stitches), so I’ll have the 8 rays of my circle set up by Row 10.
The only other question I have is one that I’ll also have to work out by sampling. The actual pattern is:
Row 1: yo, sl 1, k2 tog, psso, yo, k3 (a double decrease to take care of the two yo’s)
Row 2: Knit
Row 3: k3, yo, sl 1, k2 tog, psso, yo (a double decrease to take care of the two yo’s)
Row 4: Knit
What I’m wondering is if I substitute a k2 tog (single decrease) in the repeats on either side of the 8 markers on each pattern row, will that automatically give me the 2 increases I need in each section? It should, logically – I’m only decreasing 1 stitch instead of 2, and so there’s an extra yarn over. It doesn’t work out on paper, though. I’ll play with it tonight and see and try to report back tomorrow. With any luck I’ll have an actual sample to show you!
Monday, June 06, 2005
Today’s Rant - and a Sock Tutorial!
I’ll state upfront that I did purchase the Twisted Sisters Sock Workbook. I read it, enjoyed it, learned a bit about dyeing from it, and it now resides in my bookcase. But as a spinning and knitting veteran of uncounted pairs of socks, I thought then and think now that making socks from singles is just plain silly!
What prompted this rant? A posting on the handspun sockknitters list digest today. A newcomer spinning sockknitter was asking if it was all right to use singles for socks. My reply is quoted:
“… you can certainly spin and use singles for socks. Any yarn can be used to make a sock-shaped garment, including yarns that are very soft. The issues with using singles are: You won't get very good wear, since plying increases the strength of the yarn, and you'll need to choose a stitch pattern carefully to avoid a bias fabric - it's no fun when the sock does a half-turn between the heel and toe!
On the plus side, you can use beautiful colors with no muddying from plying. And if you like knitting socks, the wearability issue may be moot, as well.”
Yes, I was being kind – I don’t like to start flame wars on lists, it’s rude. I didn’t say anything about how silly I think the whole idea to be. But it is silly to knit socks you plan to wear from singles yarns! Now if you’re planning to use the socks as art, go for it. But if you want to wear them, learn the proper techniques for spinning sock yarn that you can actually use to make a pair of socks you can wear.
No matter how much you love knitting socks, you’ll soon tire of making a pair or two every week. And no matter how much you love to spin, you’ll grow tired of spinning sufficient yarn for a pair or two of socks each week. We all have a life outside our fiber, much as we may sometimes wish we didn't. Why not learn to do a proper job of both spinning and knitting so that you can wear your socks proudly for several years? You are, after all, the one in charge of your spinning and your knitting!
Now that I’ve blown off some steam, I’ll answer the two obvious questions. What is a proper job? How do you make socks from some of the wonderful painted rovings out there and keep the colors pretty and bright? Here is my handy-dandy cheat sheet for doing both – the sockknitting gospel according to me! You’re free to disagree – won’t hurt my feelings at all – I’ll smile and wave my handspun, handknit-covered footsies at you all the way down the road!
What is a proper job? There are all sorts of guidelines out there, but simply put: For long-wearing warm socks that will keep their shape, choose a medium-soft fleece like Romney or Border Leicester or Shetland – anything between 48 and 58 on the Bradford scale with medium crimp, including Suffolk and Dorset. Skirt and clean the fleece. Process it for socks by combing, or by carding and removing the batts from the cards in such a way as to make a semi-worsted preparation. Spin it worsted-fashion with a high degree of twist to a grist of approximately 24 wpi. Two- or three-ply the singles, again with a fairly high degree of twist, to a finished yarn of about 16-18 wpi. Cast on 18 to 24 stitches and knit a swatch in the round on needles from US size 0 to no larger than size 2. Bind off and check the gauge. It should be somewhere between 6 and 10 stitches per inch to make a long-wearing fabric.
But before you make a swatch (or after), measure your foot. Socks that don’t fit well won’t wear well! Measurements needed for a well-fitting sock:
Circumference of your leg at the point where you want the top of the sock to fall is _______.
Circumference of your ankle at the narrowest point is _________.
Length from the point where your ankle-bone begins to the bottom of your heel (heel length) is ______.
Circumference of your foot at the ‘ball’ is _________.
Circumference of your foot at its widest point (‘palm’) is _______.
Length of your foot from the back of your heel to the end of your longest toe is _______.
Now you have a gauge and a list of measurements. Before you cast on for an ankle-down sock, multiply your gauge by the measurement, then subtract an inch’s worth of stitches. That’s your cast-on number. An example: I measure 9.5 inches at the point on my calf where I like my socks to begin. Say my gauge is 7 stitches per inch. 7 times 9.5 equals 66.5. Can’t cast on a half-stitch, so round it up one. That’s 67 stitches. Now subtract 7 stitches (an inch’s worth). Cast on is 60 stitches.
Now before you ask, I’ll explain why you subtract about an inch of stitches. You want those socks to hug your legs so that they’ll stay up. But you don’t want the ribbing so stretched out after a couple of hours’ wear that they start to sag or the cast-on so tight that it cuts off circulation. An inch is just enough.
Decrease to fit the narrow part of your ankle if the difference between there and your cast-on is more than 1 ½ inches. The narrowest part of my ankle is 8 inches. I usually decrease about an inch’s worth of stitches. The key here is the word ‘about’. I do matching decreases starting at a point about 2.5 inches from my cast-on, located at the center back OR the inner leg – depends on the stitch pattern and what I plan to do about the toes. If I’m making anatomically-correct toes, I normally choose the inner leg. But if I’m making my usual side-decrease toes, I make these decreases at the center back. It saves me looking down at my ankles during a meeting and discovering that the decreases are marching nicely down the outside of my ankle!
For a 7 st/inch gauge, I’d make 5 matched decreases, with the final one occurring about a half-inch above the start of the heel. Yes, I know that adds up to 10 decreases, and that’s more like an inch and a half – but knitting is elastic, and I want those socks to fit snugly around my ankle, not pool over the top of my shoes. At this point you have 50 stitches; divide in half and make your heel over 25 stitches – 26 if you want an even number.
Do your favorite heel. I tend to do a standard turned heel – I think Priscilla Gibson-Roberts calls it a German heel – cause it fits me quite well and I’ve done so many that I can do them in my sleep. You know the one – knit across half your total stitches (25 in our example) doing a heel stitch (sl 1, k 1), then purl back across. Slip the first stitch of each row purlwise to make a nice chained edge. Don’t stint here – a too-short heel is just as uncomfortable as a too-long one. You have the measurement already – stop when you get to that length and turn the heel! You can either go back to stockinette at this point or continue in heel stitch until you’re ready for the gusset.
After you’ve turned the heel and are ready to pick up for the gusset, stop and count the number of stitches you’ve picked up on the first needle. Pick up the same number of stitches on the other side of the heel! Then do your matched gusset decreases until you have a total number of stitches that is about an inch less than the circumference of your foot. Which circumference? Well, there’s a decision to make. If the ‘ball’ of your foot and the widest part of your foot (the ‘palm’) shows a difference of more than an inch, decrease to the ‘ball’ measurement less an inch and knit an inch of length on that number of stitches. Then increase stitches on the bottom of the foot fairly quickly to make enough stitches to fit the ‘palm’ measurement – do two increases every other row until you have enough. BUT if the difference between the ‘ball’ and ‘palm’ measurements is equal to or less than an inch, don’t bother with increases – just work straight until you’re about 2.5 inches short of the total length needed for the sock foot.
Once you’ve reached this point, choose your favorite toe decrease method and finish up, Kitchenering the toes together when you have about 2-3 inches worth of stitches left on both top and bottom (28 stitches, 14 top and 14 bottom, in our example). There are various suggestions for avoiding Kitchener-stitching toes together. Some work fairly well. But learning to Kitchener stitch doesn’t really hurt – it just takes a little time. And you have a new skill at the end. So go ahead and learn it. It makes a lovely seamless sock toe, or shoulder join, or lace graft…
I can hear you now – “But I want to do a toe-up sock!” So do it. You still need a gauge swatch – then use your favorite cast-on method to put 4 inches worth of stitches (circumference equals 2 inches on top and 2 inches on the bottom) onto the needles. Increase until you’re happy, trying on as you go –you will most probably have about an inch’s less stitches on your needles than the exact circumference of your foot at the ‘palm’. Continue working until you get to the stretchy bind-off, and don’t forget to bind off in ribbing!
Now that I’ve beaten the first question into the ground, let’s take a stab at the second one. How do you spin and ply to keep those lovely colors bright and unmuddied? You actually have two options, and variations within those options. Again, you’re in charge – make a choice and follow through!
Most commercially-painted top is made up of several colors, and the colors are blended in lengthwise stripes. Those stripes are pretty well-defined. It is possible to vertically strip each stripe apart and spin each strip as a different-color singles. You’ll have a few fibers in the neighboring color(s) in each strip, but they won’t show up enough to matter. Then ply the singles normally and knit as you would for any stripe pattern, changing the colors at the points of your choice.
All right, all right – I know this takes a lot of the fun out of things. You bought that top/roving because you liked the way the colors flowed and blended. And it doesn’t help at all with the top or roving that you painted yourself in six- to ten-inch sections! I did say that there were two ways, didn’t I?
For those color sections that are greater than the length of a single fiber you can, again, take them apart and spin singles from each color, plying the singles, and blending at the knitting stage. OR, you can spin them as they come (or after vertically pre-drafting a yard or more of the color changes for shorter color repeats), letting the colors fall where they may at the singles stage. Then Navaho-ply the singles slowly and carefully to make a three-ply yarn with beautiful color definition. Again, it’s up to you, the spinner. Learning Navaho-plying isn’t all that difficult, and the ‘bumps’ disappear in firmly-plyed yarn. I’ve never felt a bump in my Navaho-plyed socks, and I have pretty sensitive feet.
You don’t have to pay any attention to my advice. But don’t come whining to me about how much time you spend knitting and then darning socks from singles. Of course my way is more work - but I make lovely socks with beautifully-defined color changes that wear for years without darning or re-knitting. And that’s worth a little more work!
Sunday, June 05, 2005

The promised pictures
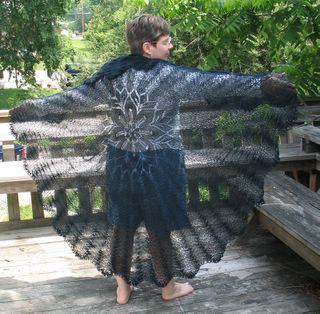
My baby alpaca feather and fan shawl, view 1
The promised pictures of the Buegler design from "A Gathering of Lace". I took it off the blocking wires just a few minutes ago.
Those of you who look closely may notice that I skipped a repeat or two in a couple of spots - I'm so short that the pattern as written would drag the ground in any reasonable wearing position! The color is actually a black with iridescent threads of green and blue. KnitPicks Alpaca Cloud yarn in the midnight colorway is wonderfully soft and dramatic. Even my teenage sons think this one is remark-worthy!
Thursday, June 02, 2005
Changes to projects…
My darling daughter made an announcement over the holiday weekend. She will be getting married around this time next year, although a definite date hasn’t yet been set. After the usual congratulations and best wishes and cautions, we talked about the shawl she had requested me to spin and knit for her (“no deadline, Mom – I won’t be getting married for a few years, at least”) a few months ago.
I started spinning the Shetland fleece in late April and May, and have about a third of it done. But it will be awhile before I get back to it. With an East Tennessee summer wedding, preferably held outdoors, any form of wool, even in a gossamer weight, will be too oppressive. If you don’t know anything about the climate here, let me clue you in. June average temperatures are around 85-90 degrees Fahrenheit, with humidity levels that match. July is worse, with a 5-10 degree hike in temperature and an equal rise in humidity. 100-degree days with 100 percent humidity are not uncommon in July and August. It’s true that those episodes don’t last more than a few days as a rule, but there’s no predicting them a year in advance!
After lots of agonizing, I’ve decided to ditch the wool in favor of reeled silk. Why reeled silk instead of spinning up enough of my stash of silk roving to do the job? Because spun silk always develops a halo with wear. The fibers are so slick, and no matter how much twist you insert, ends will escape. I’ve spun a LOT of silk through the years, fine and thick and plyed, ‘just enough twist to hold together’ to ‘treadle two more times after the single is kinking’, and the finished yarns always fuzz eventually. Now for a lot of things, that isn’t a problem, and for some it’s even a plus. But a veil needs to be smooth and fluid, and this one needs to stay that way for at least several generations. That calls for the longest, strongest fibers available, which means reeled silk.
So now I’m in the shopping stage. I’ve checked out several online sources, and finally have decided in favor of the first place I thought of – Treenway Silks in Canada, or the last place I looked – Webs. I think that Treenway’s 2P might do the job, and I emailed them asking if they agree. They answered the next morning! I do enjoy dealing with folks who answer questions so quickly!
Their answer was that the reeled 2P is tightly spun, and may not give the drape I would like in a shawl or veil, even though it will work for the project. Their suggestion is to use the 20/2 spun silk at 5000 yds/pound. The consensus was that the fuzziness wouldn’t be a problem with something like a shawl or veil that won’t see a great deal of wear. I can’t help but wonder if the knitting itself won’t cause a certain amount of wear?
Obviously I need to try a bit of each yarn and see what is going to work best. I’ll order on Friday, sample next weekend, and post the results. I have a bit of the Webs 30/2 on hand, and will probably sample that as well - I think it's spun silk, too.
As an update on another project, I’m on the final row of the alpaca Feather and Fan shawl by Buegler. I’ve been working on this for awhile, but haven’t written much about it. I bought some lovely Alpaca Cloud from KnitPicks about three months back with this particular shawl in mind. I wasn’t in a spinning mood at the time, and this yarn called to me. I’ve been working on it between other projects (the rowing socks and the lace sweaters), and am finally almost finished. Just the crochet bind-off to complete. With any luck I can finish it up tonight, block it over tomorrow, and wear it this weekend. Hopefully it won’t be too hot to do so! I’ll post a picture when it’s all finished.
Subscribe to:
Comments (Atom)