
I’ve been quiet lately – working on a sweater which I’ve now finally finished and a photo of which is below – and thinking about some things which have been passing through on the lists. This is the time of year when my creative flow usually takes a hike to make room for the yard and garden and spring cleaning. DH is taking care of the yard, and the housework took second place to some dyeing this weekend. So I’m still in full fiber mode, and spinning like crazy.
Part of what I’m spinning is sock yarn (naturally), and I’m also working on a couple of fleeces from stash. One is a Romney cross from this year’s shearing, and one a Suffolk from last year. I’ve got to dye and spin some yarn for a baby sweater, too – mustn’t forget that! If it sounds as though I’m wallowing in fleece, it’s because I am!
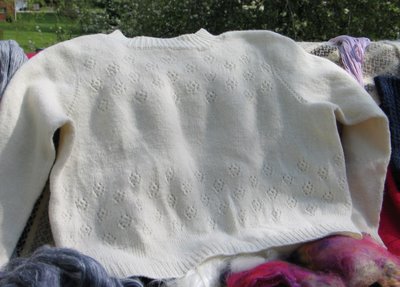
The sweater came out as a perfect fit. I did a ton of research and ripped often, but this sweater fits! For those who don’t understand the problem, let me explain. I’m five-foot nothing, 160 pounds, and hourglass- (although generously) figured. With a 46-inch bust and hips, 35-inch waist, and 15.5-inch shoulders, getting that perfect fit takes some doing! I finally resorted to several books (Priscilla Gibson-Roberts’ Knitting in the Old Way, Maggie Righetti’s Sweater Design in Plain English, and the Knitty.com article from the summer 2003 edition titled, La bonne tricoteuse – summer knitting and short rows). I also took a look at almost every other knitting book I own. Then I fired up Sweater Wizard and went into full-tweak mode. I found a lovely helper at The Knitting Fiend (http://www.thedietdiary.com/knittingfiend/OrderForms/BustDarts.html) which confirmed my math on the needed bust darts. I added those figures to the exported Word document I got from my tweaking of Sweater Wizard, and started knitting.
I finished up the sweater and wore it. Then I discovered the problems. Too short-waisted, and the neckline wasn’t high enough – I don’t want a ballet-necked wool sweater in winter – and the bottom ribbing was too big by at least 4 inches. On the plus side, the bust and armholes and shoulders were perfect and the sleeves fit, well, to perfection! I grit my teeth and started picking up, then ripping. I picked up the bottom just before the first row of the pattern and knit three inches of stockinette. It worked because of the general sweater design. Then I decreased 20 percent of the total number of stitches instead of 10 percent and re-knit the ribbing. Tried on the sweater, and it now was long enough and the ribbing fit snugly. Time for the neckline. I tried picking up the stitches, but got lost in the shoulder seams and had to graft. So then I simply gathered my courage, picked up the scissors, and cut off the neckline ribbing. I crocheted around the raw edge, picked up in the row below that, and re-knit the neckline – this time 2.5-inches long rather than 1 inch. I washed the sweater again, and will carefully store it for the fall, since now it’s much too warm to wear it (87 degrees on Easter Sunday)!
On another topic: There have been many discussions lately about knitting and spinning tools. Not just the usual types of needle and ‘what spinning wheel should I buy’ things, but questions about other fiber tools. Since I’m far from shy about expressing my opinions, I’d like to chime in here with the choices I’ve made and why I’ve made them.
First, knitting needles. First, I have nothing against metal needles as such. They’re perfectly good tools. But I don’t like to use them because they make my admittedly-aging hands ache. I have a touch of arthritis already, and am a firm convert to the ‘use it or loose it’ school of thought. So I try to use my hands a lot. My job helps, but so do the spinning and knitting and cooking I enjoy.
But wood, bamboo or plastic needles require some care. Plastic will nick and crack, and you have to watch for that. So my preferred needles are bamboo or wood. I have multiple sets of Brittany double point needles in various sizes for socks and sweater sleeves, and love them. I also own and love my Crystal Palace bamboo needles. I store all my needles in a fairly large plastic pencil case that I picked up several years ago at a back-to-school sale for a dollar. Each size has a small plastic sleeve or a small cloth sleeve if the plastic one has disappeared. Every year or so I open up the case, take each set from it’s sleeve, and lay it out on the dining room table. I have a can of paste wax handy, along with a couple of clean cotton cloths. Each needle is waxed and buffed. Needles that seem to be developing cracks are soaked in either olive oil or lemon oil prior to waxing. Needles that are currently being used in a project are removed and added to the table. It takes a couple of hours, yes, but I’m still using some of the same needles I bought more than a decade ago, and some that are more than 50 years old that I’ve inherited from various sources. A couple of hours on a rainy Saturday morning twice a year is much cheaper than buying all-new needles!
What about other tools? Knitting markers, for example, which are so easy to lose. I keep them in small envelopes, as well, sorted by color. If I can’t find the plastic envelopes in which they are purchased, I pick up a couple of fishing tackle envelopes – they’re sturdy and perfect for storing small things. They don’t require a lot of care, but the ones that look like safety pins will last longer if you open them up before storing them. Measuring tapes should be stored loosely gathered or rolled. The plastic tapes we have now say they won’t stretch. But if you leave one in a car on a summer day you’ll find that they will. Cloth tapes will also stretch with use. The only remedy for this is to replace the tapes every few years. Wait for a half-off sale at your local fabric store and stock up. I usually purchase a half-dozen tapes in every odd-numbered year.
Another useful tool is a stitch and needle gauge. If you’re lucky, you’ll find one that has three-inch windows and ¼-mm needle-gauge increments. If you do discover one of these, buy it – even if you have to put back a skein of yarn! The typical gauges have gauge holes for only US needle sizes (no help for several commonly-used mm-sized needles) and two-inch windows. Once you have it, take care to keep it unbent, untwisted, and handy. Mine is attached to a key-ring pull that is attached to my knitting bag. Between uses it resides in it’s own little pocket on the side of the bag.
Blocking tools also require care. If you own a wooden sweater blocker or sock blockers, make sure you care for them as I’ve outlined for the wooden and bamboo needles. Give these tools at least 24 hours curing time after waxing before use!
Now let’s talk about spinning tools. Your spinning wheel was a major investment. If it’s wood, you need to care for that wood properly in order for the wheel to continue to operate properly. Check your owner’s manual. Some wheels require only dusting, some require oiling or other periodic care.
Many of our spinning tools are wood. Cards and combs, for example, require oiling and polishing of the wood components, and cleaning of the metal parts. Carding cloth can be cleaned with a stiff brush (do this outside!) or by carding some completely clean, fairly long fleece. Combs can also be cleaned by using them for clean fleece, but I’ve had good results with alcohol-soaked cotton, as well, taking care to avoid the wood. The best thing to do is clean cards or combs every time you use them. Oiling and waxing the wood parts can be done a couple of times each year.
Hand-cranked drum carders also require care. If yours has a wooden base, care for it appropriately. Clean the licker-in and carding drum as recommended in your owner instructions. Oil where appropriate, change o-rings as recommended. Loosen any rubber/plastic parts when not in use. Making a rule of using only clean fiber will make this expensive tool last longer.
Spindles are frequently wood. These tools develop a lovely patina with use, both from the fiber and from our hands. But they still benefit from an oiling and waxing every six months or so to keep the wood healthy and nourished.
I’ve thrown around the words “oil and wax” quite a bit in the above paragraphs. Before you ask, I use plain old-fashioned paste wax if I can find it. The couple of times I haven’t been able to do so, I’ve used a good furniture wax with a beeswax-based formula. For oiling I like to use extra-virgin olive oil (cheaper) or lemon oil (more expensive). The olive oil will sometimes impart a slightly greenish tint to the wood, but it works well. I pour a good bit into a casserole dish and soak needles and other small tools for a while, then remove them, buff and allow to dry, then wax. Lemon oil is wonderful, but 100% lemon oil is expensive. If you do find a bargain that doesn’t contain alcohol, grab it. Orange oil will also work well.
There are a couple of combination products out there – Howard’s Feed n Wax is good, and will eliminate the oiling step. 16 ounces goes a long way and costs less than $10 U.S. It also works wonders on household woodwork.
We don’t think of our tools as particularly expensive unless we have a collection of rare-wood specialty items. We’ve usually purchased them over a long period of time, and $12 here and there doesn’t make that big a dent in the budget. But take a look around. If you had a fire, what would it cost to replace those tools at today’s prices? $1,000? $5,000? $10,000? Add it up. When you’ve recovered, you might want to take a look at your homeowner’s policy and see if you need a rider. If you do, don’t hesitate – call your agent! Then gather all your tools in one place with oil and wax at hand and protect your investment!