
I’m presently teaching a local spinning class. It’s been going on for a while now, and the students are past the beginner’s usual over- and under-spun bobbles. They’re at the point where they’re comfortable with the process of making yarn. Each of them has his or her ‘default style’ of yarn, I’ve noticed. Some have spun fairly even, fairly fine yarns almost from the beginning, others spent weeks on trying to smooth out their lumpy, bumpy yarns before they settled on sport- or worsted-weight singles.
Surprising, to me, was the fact that those on drop spindles started spinning even yarns more quickly than those with spinning wheels. After reflection, though, I can see why that might be so. A spindle gives you time to think about the process, and lets you slow down each step to a crawl, if necessary. Park and draft has a lot going for it as a beginning spinning method, and is much easier to do on a spindle. Of course it’s possible to do park-and-draft on a wheel! But those with wheels have a tendency to keep treadling, I’ve noticed, trusting that it will all work itself out in the plying (which it frequently does).
Last meeting the question I’ve been waiting for arose, as usual from the most adventurous member of the group. “How do I spin the yarn for an entire sweater?” she asked. So we began working on the next step in spinning – spinning consistent yarn for a specific project. I thought you might be interested in some of what I told the group.
Spinning just for the sake of spinning is fine. You’ll do a lot of that in the beginning, and you should. Practice makes perfect, and the more practice you get as a spinner, the better spinner you’ll become. But sooner or later you’ll decide you want to spin enough of the same thing to do an entire project in your handspun yarn. So where do you start? Naturally enough, you should start with the project!
I got some wonderful advice when I started working on consistent spinning. My spinning mentors (I was lucky enough to have two really good ones) both agreed on the best way to manage it. So I ordered three pounds of 54’s roving from a good supplier and started spinning, aiming for worsted-weight singles. I’ve described that process before – it was quite a challenge for a dedicated frog-hair spinner like me! No, I don’t need three pounds of yarn for a sweater. I only need about 18-20 ounces. But it took at least 40 of those 48 ounces of fiber to get the 24 ounces I targeted as my needed amount for a sweater. The first two 4-ounce bobbins varied widely, from my ‘unconscious’ frog-hair to bulky-weight ‘compensation’ singles. I don’t think I spun so much thick and thin when I WAS a beginning spinner! But I finally settled into the groove, and eventually found that spinning worsted-weight singles was even pleasurable! The sweater wasn’t one of my successes (and I need to re-knit it one of these days), but the spinning lesson was perfect. The upshot of all this digression? Order or have on-hand at least twice the total amount of prepared fiber you’ll need for your chosen first project. If you’re using a raw fleece, you may need as much as four times the amount you’ll need, depending on how much waste you have in the washing and preparation processes. So an entire 8-pound Targhee fleece may be just enough for a single next-to-skin sweater!
And before you cringe, you won’t have to continue that way. Now I try to make sure I have about 10-25% more prepared fiber than I need for a project. The ‘extra’ gives me sampling yardage, ‘changing my mind’ yardage, or ‘I have to have a matching _____’ yardage. But you still need to allow for processing/preparation waste. My own rule of thumb is to buy at least twice as much raw fiber as I’ll need prepared for the project, and it’s always worked so far.
All right, you’ve chosen your project; now it’s time to choose your fiber. That’s one of the most important choices you’ll make. Guidelines for fiber types for specific projects are exactly that – guidelines. You can ignore them if you choose – there are no spinning police. But you really should take a look at them; they’re guidelines for a reason. Let’s run through some of them, and the reasons behind them.
Outerwear sweaters, mittens and socks generally use medium fibers with a Bradford count from 48-54. Yes, you can use superfine merino, but there will be trade-off – you won’t get the wear you will from 54’s, and you’ll have more pilling, even if you 4-ply the yarns. Medium-staple fibers mixed with alpaca, silk, or even tencel can add drape, warmth or shine, if you prefer. Angelina can add sparkle. The nice thing about most of these medium fibers is that they have a certain amount of natural shine, and they generally take dyes beautifully. Spun medium-fine and plied to balance, these are the workhorses of the spinning world, giving long wear and beautiful results to knitting projects from lacy 2-ply cardigans to cabled 4-ply Aran pullovers.
Next-to-skin wear other than socks, like warm sweaters, gloves, scarves and hats usually call for finer fibers, those in the 60’s Bradford range. That’s a compromise. You’ll get some pilling, and you’ll need to watch areas like underarms for wear, but you won’t have to wear a shirt under the sweater, and your hands will stay warm even playing in the snow. These are perfect places to blend exotics. A 60/40 mixture of Rambouillet or merino and alpaca will keep you toasty warm even if you’re exceptionally cold-natured and adding 20% of angora or kid mohair to your wool may have you stripping to your undershirt indoors.
Certain types of projects require specific wools. Shawls can be made with wonderful drape and softness from an alpaca/silk blend. Soft, cuddly fibers are a natural for shawls for babies and special occasions, and can be wonderfully comforting anytime. Generally, however, spinning shawl-knitters choose something with a less-pronounced crimp for their finest wedding-ring shawls. Why? Merino is great for many uses, but I seldom choose it for a shawl. That lovely crimp blocks out to almost 40 percent larger than the unblocked size. And two weeks (or one humid day) later, the shawl will again be the unblocked size. By all means use merino for a shawl – but plan to knit the shawl to the size you want it to be when worn. Shetland, that staple for fine shawls, has less crimp than merino – in fact, its crimp is more like that of the average medium wool – and is almost as fine in diameter as merino. This gives lace a crisp hand, and blocking holds until the next time you wash and block, even in high humidity. So check out the recommended fibers for your project, and figure out why they’re recommended – then make your own decision!
Exotics are wonderful for many projects. Knitters know to be aware of their tendency to grow either lengthwise or widthwise, and spinners can compensate for this by blending them will lovely, elastic, fine wool. You can generally stretch those exotic (and expensive) fibers at least four times further than you thought by blending them with wool in a 25/75 proportion by weight. The look and feel and drape will be present, but the wear may be much improved. However, there is little more sinfully luscious than a 100% down fiber scarf tucked around the collar of your winter coat, or a 100% silk shawl to throw around your shoulders in frigid summer air-conditioning. My own favorite winter hats are made from 100% alpaca. One is a rather whimsical wide-brimmed felted creation of burgundy-dyed handspun, and the other a snug, natural brown-colored double-layered stocking cap with a lace inset that’s almost too warm in East Tennessee!
All right, you’ve chosen your project and your fiber. You’ve probably also chosen your preparation – worsted prep (combed fibers) for harder-wearing items like socks and barn sweaters, woolen-prep (carded fibers) for warm hats, mittens, and sweaters. Don’t make the mistake of thinking you can spin carded fibers into something that’s ‘good enough’ for a project that should use worsted fibers. It may spin well, knit nicely, and look great at first, but you won’t get the wear you would from equally well-spun worsted-prep fibers. Preparation matters. It matters in the spinning, in the knitting or weaving, and in the finished item. Properly-prepared fibers spin easily and pleasantly. Poorly-prepared fibers fight you every step of the way. So take the time to do proper fiber preparation!
And don’t think that buying commercially-processed fibers lets you out of preparation completely! Top must sometimes be split lengthwise to spin easily, and it will always need to be fluffed up and pre-drafted to some extent. Roving should also be loosened up and pre-drafted a bit for easier spinning. Skipping this step in the interest of saving time is one of those things that will inevitably bite you.
Are we finally to the spinning? Not quite. Before you sit down to start spinning your 2 pounds of fiber (or more), take a minute to think about what kind of yarn you want. If you’re going to do a knitted and fulled project like my floppy alpaca hat or those wonderful, ubiquitous FiberTrends slippers, you’ll want a fluffy, bulky singles or 2-ply yarn spun from worsted-prep fibers (think about why). If your project is a tightly-cabled fisherman sweater, your desire will be for finely-spun worsted singles that can be 4-plied into a lovely, round yarn that will make your stitch details pop! The requirements for socks will vary, but generally will be finely-spun worsted singles that can be either 3-plied or cabled for abrasion resistance to a fingering-weight yarn.
Now that you know what sort of yarn you want to spin, set up the wheel or choose a spindle. Learn to use your whorls – they’re your friends. Yes, you can spin cotton on a 6:1 whorl. But you’ll spin it more easily and pleasantly at a 20:1 ratio. Conversely, if you want lace-weight Shetland singles, you probably won’t want to spin at a 16:1, but at a 6:1 ratio. That way you’ll have time to pay attention to your drafting triangle and stop when you find a slub that’s trying to sneak into your lovely, even yarn. And you won’t over-spin your singles to the point where your 2-ply will corkscrew back on itself!
As for choosing a spindle…the general guideline is to choose a lighter spindle for finer yarns. There is one extremely good reason for this – a heavy spindle can literally snap gossamer yarns! But you do use a fairly heavy supported spindle to spin extremely fine singles. The difference is whether the singles themselves or the table/floor/spinner’s leg is supporting the weight of that spindle. I have a couple of very light-weight spindles that I can use to drop-spindle cotton as long as it’s Sea Island, pima or something else fairly long-stapled. Those same spindles don’t work well at all for acala or upland cotton unless I support them. But then they usually aren’t heavy enough to turn well against the resistance of that support. So for upland or acala, I use a takli, which is a lousy drop spindle, but a great supported spindle.
Spinning wheels are general-purpose machines. Spindles are more specialized hand tools, and spindlers will have their favorites just as chefs have favorite knives. As spinners we need to understand the possibilities and limitations of our tools’ abilities. However, an adventurous spinner will push those same tools to their limits, making them do things other spinners would never imagine.
You’ve begun spinning for your project, finally. Now it’s bedtime on Sunday night, and you won’t have a chance to sit down and spin again until Wednesday. How do you make sure you start spinning the same grist next time? A sample helps. Find a sheet of paper and tape a sample to it, or tie a longer sample to your spinning wheel somewhere. You can fondle it before you sit down next to refresh your fingers’ memory of the way the ‘proper’ yarn feels. It may take you a minute or two to get back into the groove of spinning it, but that’s OK. After you feel you’ve ‘found your niche’ again, stop the wheel (or spindle), unwind a bit, and see how it compares with your sample. If it’s pretty close, just leave it. If it’s way off, pull it back off, break it loose, and toss it away (or save it for something else). Then attach your fiber again and start spinning what you wanted. It’s only a bit of fiber, and you’ve got plenty.
Finish all yarn before you start knitting with it. I don’t make many flat statements, so please listen! I know you don’t like waiting for the skeins to dry – I don’t either. But I’ve had the requisite number of disasters to make me fully cognizant of the potential for a repeat catastrophe if I don’t take the time to complete this step. I’m always reminded of a weaving maxim – it isn’t finished until it’s wet-finished. Washing yarn allows for more than cleaning. It allows twist to settle and yarn to bloom, and makes knitting or weaving more pleasant. It allows you to discover in advance that your dyes are running, and do something about it before you put them next to a contrasting border or stripe. It fills the room with the lovely smell of clean wet wool. And it gives you time to make your final design decisions, dig out the proper knitting needles or reed, and look at your notes or pattern one more time.
Conventional wisdom says to spin and finish all of the yarn for a project before you begin knitting. There are indeed spinners who do exactly that. There are far more who can’t wait to get into the knitting part of the project, and who spin only when they need more knitting yarn. Either way will work, as long as you keep careful notes about how you finished your yarn and samples of each step of the process. This should prevent you from starting a center-out round shawl with lace-weight 2-ply that finishes off with a DK-weight knitted border.
Any spinner who has learned how to make fairly even singles can then go on to spin any yarn he/she likes. It’s simply a matter of being willing to play until you find the best way for you to get what you want. There are no short-cuts to the learning curve. Spinners aren’t usually those in search of instant gratification – we enjoy the process, whether it’s the process of creating yarn or the process of creating unique, one-of-a-kind items. That isn’t to say spinners aren’t frequently perfectionists – many of us wear that label along with its sibling, obsessive-compulsive syndrome. In some cases that longing to control all the variables is part of what started us spinning! But many of us who wear those labels have also learned the knack of ‘exempting’ part of our spinning time from our obsessive behavior. I decided long ago that spinning time was play time. And play time is ‘time out’ from trying to be perfect – otherwise it isn’t play! Surprisingly (or perhaps not), I’ve become easier to live with since I remembered how to play. I’ve also become a much better spinner, a more adventurous weaver, and a more adventurous knitter!
Thursday, June 29, 2006


Wednesday, June 21, 2006
Summer Update
Things are hopping at work and at home these days, so the blog has rather fallen by the wayside. Life has a way of interfering from time to time, I’ve noticed. I always make time for some sort of fiber project, though.
I’ve been spinning for and knitting lots of socks lately. It’s my usual summer project, for a variety of reasons, and rather comforting to spin for something so familiar after several months of experimentation with exotic fibers.
Pictures will have to follow later, but I’ve been working on several sock yarns. Medium fleeces of about a 54-56 Bradford count, either generic 56’s from Woodland Woolworks (http://woodlandwoolworks.com/) or some Romney/Shetland cross fleece from a local shearing earlier this spring. Also in the works is a pair of socks from some Romney I spun up and dyed deep burgundy last year.
You know me – I can’t resist tinkering a bit! One of the yarns of 56’s was spun roughly mixed with some silk roving I bought awhile back. How do you rough-mix? Well, you lay out a long length of wool roving on the floor and spread it out. Then you take a strip of silk roving, split it lengthwise into quarters, and spread those quarters out over the length of wool. Pre-draft both fibers together and spin into a thin yarn, then 2-ply and cable for a wonderful sock yarn. Shiny sections will be mostly silk, and since the singles are quite thin (about 36 wpi) those shiny sections get spread throughout the finished yarn. The finished cabled yarn is lovely – cushy and with just a bit of crunch from the silk, and about 18 wpi. It worked up into a nice sturdy sock fabric on size 0 bamboo needles at a gauge of 7 stitches per inch. And the variegated pink dye is perfect – I’ll love these on cold, dreary January days this winter!
The Romney/Shetland cross is being combed on my Viking double-pitch combs. This is a really nice fleece, medium gray in color with a staple length of about 3-4 inches. I deliberately left just a little grease in the fleece when washing, because I knew I wanted to spin it quite thin and cable. And I love the way the yarn fulls when I spin it this way! The singles are done after a weekend-long public demonstration two weeks ago, and are patiently awaiting plying and cabling. They’ll have to continue to wait, I’m afraid, for at least another week – I stepped down off some stairs the wrong way and slightly tore my Achilles tendon last week. So now spinning is going to have to await healing!
This will be something of a whine, so if you want to skip this paragraph, feel free. I am the lucky owner of three spinning wheels – a Majacraft Rose, a Kromski Symphony, and an Ashford Traveler. All of those wheels are double-treadle, because that’s much easier for a back that I did in years ago. I’ve heard so many times (and even said myself!) that any DT wheel can be used as a single-treadle if necessary. And they can - for a short time, and very carefully. But they aren’t designed to work as ST’s, and they don’t like to be used as ST wheels. Now I’m upset because I can’t spin for at least two entire weeks UNLESS I can manage to do so in a ST fashion. Since I’m currently concerned with plying thin yarns (about 45 wpi), a lot of control is needed. And I cannot manage that kind of control in ST mode! I’ve tried – oh how I’ve tried – but I cannot do it. After just a couple of minutes, the wheel starts to reverse direction, my back begins to throb, and I feel like I really need a glass of something! I really do need just one more wheel, thank you very much, and that one needs to be a single-treadle! Maybe if I’m a very good girl Santa will bring me one? Probably not, but I can still wish!
The burgundy socks are an UFO. I started them last summer, in fact, in a feather-and-fan lace pattern very similar to the one in “Socks, Socks, Socks.” But I quickly grew weary of the pattern, and put them aside for the Christmas, winter and spring knitting. Now I need to finish the second sock (I’m almost at the heel), and am making myself do at least two pattern repeats a day. Peculiarly, I’m not finding the pattern quite as much of a slog this time around. I started these socks just after finishing up the Buegler Feather and Fan Shawl from GOL; perhaps I was just bored with F&F?
I gave myself a treat for the cooler September spinning season, and I like the look of the roving so much that I may take it along on vacation in August as a spindle project! I ran across some absolutely beautiful fine black alpaca that was mixed with silk in a 60/40 ratio. Both fibers are naturally-colored, and I have decided on a Christmas project for the yarn. Spinning this should be pure pleasure! But not the type of pleasure I want during an East Tennessee summer of 90-degree-plus days with 90 percent humidity levels! Vacation will be the earliest I’ll touch this, and only then if the ocean breezes cool things off enough to make it pleasurable.
I’ve been spinning for and knitting lots of socks lately. It’s my usual summer project, for a variety of reasons, and rather comforting to spin for something so familiar after several months of experimentation with exotic fibers.
Pictures will have to follow later, but I’ve been working on several sock yarns. Medium fleeces of about a 54-56 Bradford count, either generic 56’s from Woodland Woolworks (http://woodlandwoolworks.com/) or some Romney/Shetland cross fleece from a local shearing earlier this spring. Also in the works is a pair of socks from some Romney I spun up and dyed deep burgundy last year.
You know me – I can’t resist tinkering a bit! One of the yarns of 56’s was spun roughly mixed with some silk roving I bought awhile back. How do you rough-mix? Well, you lay out a long length of wool roving on the floor and spread it out. Then you take a strip of silk roving, split it lengthwise into quarters, and spread those quarters out over the length of wool. Pre-draft both fibers together and spin into a thin yarn, then 2-ply and cable for a wonderful sock yarn. Shiny sections will be mostly silk, and since the singles are quite thin (about 36 wpi) those shiny sections get spread throughout the finished yarn. The finished cabled yarn is lovely – cushy and with just a bit of crunch from the silk, and about 18 wpi. It worked up into a nice sturdy sock fabric on size 0 bamboo needles at a gauge of 7 stitches per inch. And the variegated pink dye is perfect – I’ll love these on cold, dreary January days this winter!
The Romney/Shetland cross is being combed on my Viking double-pitch combs. This is a really nice fleece, medium gray in color with a staple length of about 3-4 inches. I deliberately left just a little grease in the fleece when washing, because I knew I wanted to spin it quite thin and cable. And I love the way the yarn fulls when I spin it this way! The singles are done after a weekend-long public demonstration two weeks ago, and are patiently awaiting plying and cabling. They’ll have to continue to wait, I’m afraid, for at least another week – I stepped down off some stairs the wrong way and slightly tore my Achilles tendon last week. So now spinning is going to have to await healing!
This will be something of a whine, so if you want to skip this paragraph, feel free. I am the lucky owner of three spinning wheels – a Majacraft Rose, a Kromski Symphony, and an Ashford Traveler. All of those wheels are double-treadle, because that’s much easier for a back that I did in years ago. I’ve heard so many times (and even said myself!) that any DT wheel can be used as a single-treadle if necessary. And they can - for a short time, and very carefully. But they aren’t designed to work as ST’s, and they don’t like to be used as ST wheels. Now I’m upset because I can’t spin for at least two entire weeks UNLESS I can manage to do so in a ST fashion. Since I’m currently concerned with plying thin yarns (about 45 wpi), a lot of control is needed. And I cannot manage that kind of control in ST mode! I’ve tried – oh how I’ve tried – but I cannot do it. After just a couple of minutes, the wheel starts to reverse direction, my back begins to throb, and I feel like I really need a glass of something! I really do need just one more wheel, thank you very much, and that one needs to be a single-treadle! Maybe if I’m a very good girl Santa will bring me one? Probably not, but I can still wish!
The burgundy socks are an UFO. I started them last summer, in fact, in a feather-and-fan lace pattern very similar to the one in “Socks, Socks, Socks.” But I quickly grew weary of the pattern, and put them aside for the Christmas, winter and spring knitting. Now I need to finish the second sock (I’m almost at the heel), and am making myself do at least two pattern repeats a day. Peculiarly, I’m not finding the pattern quite as much of a slog this time around. I started these socks just after finishing up the Buegler Feather and Fan Shawl from GOL; perhaps I was just bored with F&F?
I gave myself a treat for the cooler September spinning season, and I like the look of the roving so much that I may take it along on vacation in August as a spindle project! I ran across some absolutely beautiful fine black alpaca that was mixed with silk in a 60/40 ratio. Both fibers are naturally-colored, and I have decided on a Christmas project for the yarn. Spinning this should be pure pleasure! But not the type of pleasure I want during an East Tennessee summer of 90-degree-plus days with 90 percent humidity levels! Vacation will be the earliest I’ll touch this, and only then if the ocean breezes cool things off enough to make it pleasurable.
Thursday, May 18, 2006
A Paean to Silk

I love silk, and once in a while I just have to play! The above was the result of a weekend experiment. I dyed, spun and knitted a silk bell or cap into the cell phone cozy shown. It's the perfect size for carrying my cell around the office building where I work, and has enough extra room to tuck latte money inside as well!
Silk is the undisputed queen of fibers. No other fiber has the texture, sheen, strength and drape of silk, whether the fabric is woven, knitted, or knotted. Manmade fibers such as rayon, tencel, and soy are merely attempts to imitate what Mother Nature did with the Bombyx Mori moth – nice enough, to be sure, but still imitations.
In cost, silk is in the mid-range of fibers, with prices for silk top ranging from $40 to $75 per pound. Cocoons, bricks, and bells are less expensive, ranging between $2.50 and $5.50 per ounce. They are a wonderful option for many applications, including learning to spin this fabulous fiber.
Most spinners love to spin silk once they’ve tried it. We mix silk top in different proportions with all animal fibers and even cotton. Sock knitters mix silk with wool for strength and sheen. Weavers and knitters mix it with wool, alpaca and cashmere for the subtle sheen, unmatched drape and to stretch precious fibers. Dedicated cotton spinners mix it with dyed cotton lint to increase the shine and strength of their singles. Some spinners have made a lifetime study of silk in its many forms, spinning soft, textured yarns and harder, shiny ones. I’ve even heard of a couple of spinners who learned to spin by spinning silk!
First, let’s talk about the silk itself. Like most natural products, it comes in a variety of colors and qualities. Both color and quality depend upon the diet of the silkworms. Feed the worms low-quality foliage, and you will get low-quality silk, with weak spots and breaks in the length of the fiber. Feed the worms fresh, healthy mulberry leaves and you’ll get various shades of white cocoons, shiny and containing fine, strong fibers. Feed them different types of oak leaves and you’ll obtain various shades of tan and brown cocoons. Is there a science to the feeding? Of course. A good silk buyer can tell from the shade and quality of the cocoons where the silkworms were raised and whether there was adequate rainfall that season. Since they’ve done the hard part for us, we can simply concentrate on the shade of the fiber.
One caveat, however. If you’re tempted by a really good bargain in silk roving, check it carefully before you put down your hard-earned cash or plastic. Sometimes silkworms are fed a diet that is less than perfect, sometimes the weather is poor during their lifespan. This can result in fiber that is weak and brittle. Silk should be strong, requiring real muscle to break even a few of the short fibers in top or roving form. If you’re looking at bells or cocoons, see if the fibers are broken or if they appear to have thin spots. If the seller doesn’t want to allow you to inspect the silk, or if the color appears uneven, pass it by - it isn’t really a bargain.
Silk comes to spinners in several forms, as I mentioned above. Each has its uses for the fiber artist, so we’ll talk about each in turn. First are the cocoons themselves. You can dye them as cocoons with protein-fiber dyes, soak them for 24 hours in a crock-pot placed on low, pull the cocoons into a length and spin a very textured, heavy silk yarn. Beautiful as an accent yarn in any fabric. Of course, you have to remove the worm, but that isn’t really a problem.
You can reel and throw the silk yourself, which is a great deal of fun, but rather time-consuming. It does, however, make a beautiful, smooth yarn with all the best characteristics of the fiber. These yarns are perfect for weaving, lace-making, or knitting on very fine needles. A single ply (containing the unreeled fiber from 6 to 20 cocoons) can be plied with a single of another fiber for a mixed yarn with characteristics of both fibers. Directions for reeling silk are available in many locations, especially http://www.wormspit.com/.
The second form in which we buy silk fiber is that of a cap or handkerchief. These are fun, too. Silk caps are bell-shaped; handkerchiefs are square (just use the terms interchangeably – they’re the same thing except for the shape) and can be dyed with wool or protein fiber dyes as easily as wool. They will grab the color, giving brilliant results. After the cap is dry, separate it into single layers by inserting your hands into the center and snapping them apart several times around the circumference of the cap until it is loosened and fluffy. Then carefully pull the layers apart. Draw each layer out into a long, untwisted roving. You can wrap this around a paper roll or index card - a nostepinne works in a pinch, too. Then spin this “roving” or use it as is in a knitted or woven fabric. If you choose to use the roving unspun, be aware that the finished fabric will pick easily; a tight gauge will help with this.
The third form in which we purchase silk is probably the most common for spinners. That is silk roving or top. In order to produce this form, the reeled silk is cut into lengths varying from four to six inches. These cut lengths are then run through the same equipment that produces other fiber tops. The final product (prior to spinning) is a thick, unspun rope of aligned fibers. This is probably the easiest form of silk to blend with other fibers. If necessary, the fibers in the top can be cut into even shorter lengths to blend with shorter fibers like fine wools and cottons. While a cotton/silk blend is labor-intensive to produce by hand, it is beautiful in its final form. If doing it yourself doesn’t appeal, there are lovely painted rovings available from various sources.
Silk top forms a strong, slightly- to very-fuzzy yarn. The fuzziness will increase with wear. Why does a smooth fiber like silk turn fuzzy? Because the fibers in top have been cut to shorter lengths. Silk is a very smooth, slick fiber, with none of the scales and roughness associated with wools and bast plant fibers. When spun, these short ends escape the twist and create a halo effect in the yarn. This tendency can be used as a design element and enhanced by spinning the silk softly, which will increase the halo. The halo of soft-spun silk can approach that of angora or mohair. The spinner can also choose to minimize the halo by making very tightly-spun yarns with a great deal of twist. While these yarns will approach the appearance of reeled silk threads immediately after spinning, they will eventually halo as well (although not to the degree of the softer-spun yarns). The spinner is the designer here. Sample as necessary to create the yarn you want.
A little silk can go a long way. An ounce of silk will make anywhere from a hundred to a thousand yards of yarn. Again, the spinner determines the finished grist of the yarn. Some things to consider, though, are the final use of the yarn and the wear it will receive. My personal experience is that high-twist fine yarns show the sheen of the silk fiber best. These singles, with a grist usually between 60 and 100 wraps per inch, can be plied to whatever thickness is desired. These yarns are shiny and very strong, even in singles forms, as long as they have sufficient twist. Go back to your early days as a spinner when spinning silk. Twist is your friend, so use plenty of it! It takes a great deal of twist to keep the fibers in silk top from escaping. Twist also enhances the appearance of the silk yarn. So use your smallest whorl and treadle rapidly, or get out your lightest spindle and use lots of twist, adding even more than you think necessary. The finished yarn will be better for it.
I love to dye silk in any form. Spinning dyed silk caps, cocoons, or top is a pleasure. Silk is a protein fiber, so dyeing is simple. Silk dyes brilliantly with any wool dyes, commercial or natural, and you can obtain beautiful results with even simple dyes like food coloring and kool-aide. Mordants are simple as well - white vinegar or acetic acid give wonderful results. If you choose white vinegar, use approximately 1 cup per gallon of dye bath. If microwave or oven dyeing, simply soak the silk in the vinegar/water bath overnight before dyeing. Watch your temperature in the dye bath, however. Boiling water temperatures will cause the silk fibers to break down and weaken. So keep the dye bath at no more than 180 degrees Fahrenheit. Be sure to rinse your dyed fibers or yarns well, and a final rinse with some white vinegar added will neutralize any remaining dyes. Dry out of direct sunlight.
Silk and animal fiber blends are equally simple to dye. Just be sure to keep temperatures suited to the more delicate silk fibers. Silk-cotton blends are trickier. In home production, it’s usually best to dye the fibers separately and then combine them in the carding stage. The reason is simple. Cotton is a cellulose fiber that must be “scoured” and mordanted with often caustic chemicals in order to accept dyestuff. These mordants will destroy the silk fibers.
You can work around this, however. Silk is very reflective. It will blend well with dyed cottons with no dyeing itself. This makes it possible to blend silk with dyed cotton. Very fine silk singles can be plied with cotton and will almost disappear, with the eye focusing on only the dyed cotton color. You can also choose to dye only the silk, which will create a yarn with a tweedy or mottled effect, with the dyed silk showing as shiny flecks against the cotton. Or, as stated above, you can dye the silk separately and then combine the fibers. Again, spinner’s choice.
Treat all finished yarns and articles as though they were 100% silk. Silk care should consist of hand or very gentle machine washing in mild, neutral pH detergent. Following that with a vinegar rinse is recommended, too. Follow by flat or line drying and a cool iron if necessary. Silk is quite strong in mass, but individual fibers are delicate. The fine fibers will break down easily, and prolonged agitation or tumbling will hasten this process. Treated appropriately, however, silk is quite sturdy, with some of the fabrics lasting for generations. One additional note as to care is in order. Moths like silk as well as wool. So take precautions against infestation in both your finished articles and your fiber. Enjoy exploring the many facets of silk. It is, indeed, the queen of fibers, and will reward your efforts at understanding with many hours of spinning and wearing pleasure.
Details on the creation above? I dyed the silk cap with Wilton cake color in Delphinium, pre-soaking on Thursday night in a vinegar/water mixture and microwave dyeing on Friday after work. Saturday morning I pulled apart the silk cap, made it into a rough roving, and spun the layers into singles on a combination of spindle while I did errands and attended a guild meeting and wheel after I returned home. Sunday I plied the singles Navaho-fashion, mostly to preserve the lovely colorways. Twist in both singles and plies was quite high. The finished 3-ply yarn was between 15-18 wpi. I didn't even wash the yarn to set the twist - just cast on 39 stitches and immediately began a K2P1 ribbing, which I continued to the final four rows. I decreased 4 stitches every row on those last four rows, sock-toe fashion, switching to stockinette for those rows only. Finished up with a 3-needle bind-off to close the end, and made a three-ply cord of some of the remaining silk, stitching it to the top of the small purse with more of the silk.
The ribbing hugs the phone and, since it's about 2 inches longer than the phone itself, snuggles in above the phone to keep it in the purse. Yet when the phone rings, a simple squeeze at the bottom pops it out. The shawl pin decoration was an inspiration with a practical bent - I keep it in the office to wear with one of my shawls when the air conditioning gets to be too much and am constantly losing it in my desk drawer. This way I know exactly where it is when needed!
Monday, April 17, 2006
Catching-up - notes on sweater fitting and tools
I’ve been quiet lately – working on a sweater which I’ve now finally finished and a photo of which is below – and thinking about some things which have been passing through on the lists. This is the time of year when my creative flow usually takes a hike to make room for the yard and garden and spring cleaning. DH is taking care of the yard, and the housework took second place to some dyeing this weekend. So I’m still in full fiber mode, and spinning like crazy.
Part of what I’m spinning is sock yarn (naturally), and I’m also working on a couple of fleeces from stash. One is a Romney cross from this year’s shearing, and one a Suffolk from last year. I’ve got to dye and spin some yarn for a baby sweater, too – mustn’t forget that! If it sounds as though I’m wallowing in fleece, it’s because I am!
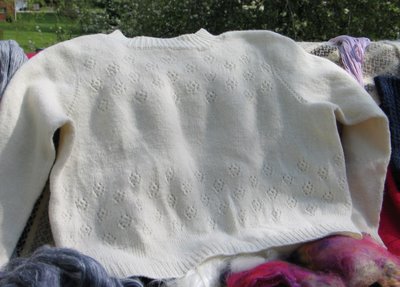
The sweater came out as a perfect fit. I did a ton of research and ripped often, but this sweater fits! For those who don’t understand the problem, let me explain. I’m five-foot nothing, 160 pounds, and hourglass- (although generously) figured. With a 46-inch bust and hips, 35-inch waist, and 15.5-inch shoulders, getting that perfect fit takes some doing! I finally resorted to several books (Priscilla Gibson-Roberts’ Knitting in the Old Way, Maggie Righetti’s Sweater Design in Plain English, and the Knitty.com article from the summer 2003 edition titled, La bonne tricoteuse – summer knitting and short rows). I also took a look at almost every other knitting book I own. Then I fired up Sweater Wizard and went into full-tweak mode. I found a lovely helper at The Knitting Fiend (http://www.thedietdiary.com/knittingfiend/OrderForms/BustDarts.html) which confirmed my math on the needed bust darts. I added those figures to the exported Word document I got from my tweaking of Sweater Wizard, and started knitting.
I finished up the sweater and wore it. Then I discovered the problems. Too short-waisted, and the neckline wasn’t high enough – I don’t want a ballet-necked wool sweater in winter – and the bottom ribbing was too big by at least 4 inches. On the plus side, the bust and armholes and shoulders were perfect and the sleeves fit, well, to perfection! I grit my teeth and started picking up, then ripping. I picked up the bottom just before the first row of the pattern and knit three inches of stockinette. It worked because of the general sweater design. Then I decreased 20 percent of the total number of stitches instead of 10 percent and re-knit the ribbing. Tried on the sweater, and it now was long enough and the ribbing fit snugly. Time for the neckline. I tried picking up the stitches, but got lost in the shoulder seams and had to graft. So then I simply gathered my courage, picked up the scissors, and cut off the neckline ribbing. I crocheted around the raw edge, picked up in the row below that, and re-knit the neckline – this time 2.5-inches long rather than 1 inch. I washed the sweater again, and will carefully store it for the fall, since now it’s much too warm to wear it (87 degrees on Easter Sunday)!
On another topic: There have been many discussions lately about knitting and spinning tools. Not just the usual types of needle and ‘what spinning wheel should I buy’ things, but questions about other fiber tools. Since I’m far from shy about expressing my opinions, I’d like to chime in here with the choices I’ve made and why I’ve made them.
First, knitting needles. First, I have nothing against metal needles as such. They’re perfectly good tools. But I don’t like to use them because they make my admittedly-aging hands ache. I have a touch of arthritis already, and am a firm convert to the ‘use it or loose it’ school of thought. So I try to use my hands a lot. My job helps, but so do the spinning and knitting and cooking I enjoy.
But wood, bamboo or plastic needles require some care. Plastic will nick and crack, and you have to watch for that. So my preferred needles are bamboo or wood. I have multiple sets of Brittany double point needles in various sizes for socks and sweater sleeves, and love them. I also own and love my Crystal Palace bamboo needles. I store all my needles in a fairly large plastic pencil case that I picked up several years ago at a back-to-school sale for a dollar. Each size has a small plastic sleeve or a small cloth sleeve if the plastic one has disappeared. Every year or so I open up the case, take each set from it’s sleeve, and lay it out on the dining room table. I have a can of paste wax handy, along with a couple of clean cotton cloths. Each needle is waxed and buffed. Needles that seem to be developing cracks are soaked in either olive oil or lemon oil prior to waxing. Needles that are currently being used in a project are removed and added to the table. It takes a couple of hours, yes, but I’m still using some of the same needles I bought more than a decade ago, and some that are more than 50 years old that I’ve inherited from various sources. A couple of hours on a rainy Saturday morning twice a year is much cheaper than buying all-new needles!
What about other tools? Knitting markers, for example, which are so easy to lose. I keep them in small envelopes, as well, sorted by color. If I can’t find the plastic envelopes in which they are purchased, I pick up a couple of fishing tackle envelopes – they’re sturdy and perfect for storing small things. They don’t require a lot of care, but the ones that look like safety pins will last longer if you open them up before storing them. Measuring tapes should be stored loosely gathered or rolled. The plastic tapes we have now say they won’t stretch. But if you leave one in a car on a summer day you’ll find that they will. Cloth tapes will also stretch with use. The only remedy for this is to replace the tapes every few years. Wait for a half-off sale at your local fabric store and stock up. I usually purchase a half-dozen tapes in every odd-numbered year.
Another useful tool is a stitch and needle gauge. If you’re lucky, you’ll find one that has three-inch windows and ¼-mm needle-gauge increments. If you do discover one of these, buy it – even if you have to put back a skein of yarn! The typical gauges have gauge holes for only US needle sizes (no help for several commonly-used mm-sized needles) and two-inch windows. Once you have it, take care to keep it unbent, untwisted, and handy. Mine is attached to a key-ring pull that is attached to my knitting bag. Between uses it resides in it’s own little pocket on the side of the bag.
Blocking tools also require care. If you own a wooden sweater blocker or sock blockers, make sure you care for them as I’ve outlined for the wooden and bamboo needles. Give these tools at least 24 hours curing time after waxing before use!
Now let’s talk about spinning tools. Your spinning wheel was a major investment. If it’s wood, you need to care for that wood properly in order for the wheel to continue to operate properly. Check your owner’s manual. Some wheels require only dusting, some require oiling or other periodic care.
Many of our spinning tools are wood. Cards and combs, for example, require oiling and polishing of the wood components, and cleaning of the metal parts. Carding cloth can be cleaned with a stiff brush (do this outside!) or by carding some completely clean, fairly long fleece. Combs can also be cleaned by using them for clean fleece, but I’ve had good results with alcohol-soaked cotton, as well, taking care to avoid the wood. The best thing to do is clean cards or combs every time you use them. Oiling and waxing the wood parts can be done a couple of times each year.
Hand-cranked drum carders also require care. If yours has a wooden base, care for it appropriately. Clean the licker-in and carding drum as recommended in your owner instructions. Oil where appropriate, change o-rings as recommended. Loosen any rubber/plastic parts when not in use. Making a rule of using only clean fiber will make this expensive tool last longer.
Spindles are frequently wood. These tools develop a lovely patina with use, both from the fiber and from our hands. But they still benefit from an oiling and waxing every six months or so to keep the wood healthy and nourished.
I’ve thrown around the words “oil and wax” quite a bit in the above paragraphs. Before you ask, I use plain old-fashioned paste wax if I can find it. The couple of times I haven’t been able to do so, I’ve used a good furniture wax with a beeswax-based formula. For oiling I like to use extra-virgin olive oil (cheaper) or lemon oil (more expensive). The olive oil will sometimes impart a slightly greenish tint to the wood, but it works well. I pour a good bit into a casserole dish and soak needles and other small tools for a while, then remove them, buff and allow to dry, then wax. Lemon oil is wonderful, but 100% lemon oil is expensive. If you do find a bargain that doesn’t contain alcohol, grab it. Orange oil will also work well.
There are a couple of combination products out there – Howard’s Feed n Wax is good, and will eliminate the oiling step. 16 ounces goes a long way and costs less than $10 U.S. It also works wonders on household woodwork.
We don’t think of our tools as particularly expensive unless we have a collection of rare-wood specialty items. We’ve usually purchased them over a long period of time, and $12 here and there doesn’t make that big a dent in the budget. But take a look around. If you had a fire, what would it cost to replace those tools at today’s prices? $1,000? $5,000? $10,000? Add it up. When you’ve recovered, you might want to take a look at your homeowner’s policy and see if you need a rider. If you do, don’t hesitate – call your agent! Then gather all your tools in one place with oil and wax at hand and protect your investment!
Wednesday, March 22, 2006
Historical Spinning
I’ve talked before about “historical knitting” – now let’s shift the focus a bit to “historical spinning,” or some of the ways spinning has changed in Appalachia in the last 100 years.
My grandmother, shortly before her death, saw some of my earliest alpaca/silk blend handspun. She was astonished at the softness, shine and clarity of color. One of the comments she made was “I wish Mother could have felt this!”
I pursued the comment just a bit, but Grandma was weak, and had little to say except that the sheep’s wool spun during her young years by her mother was prickly and rather harsh. The finest stuff was from the neck area of the sheep, and even that was rather stiff. Her final comment was that her girlhood socks always made her legs itch.
I’ve done a bit of back-tracking, collecting recollections and reminiscences from relatives and neighbors, trying to find out what sort of sheep Great-Grandma was most likely to have had access to as a spinner. The best guess to date is a cross of Shropshire and Shetland or Romney. These sheep did fairly well as wool producers and lambs provided a helpful dose of protein for the diet of hill farmers and coal miners. The wool would have probably been a medium type, with a Bradford count in the 50s, especially given the diet of scrub brush and hill grass available in that place and time. So Grandma probably did have scratchy socks!
I’ve seen bits and pieces of the various fabrics made from this wool; as quilt pieces and scrap bits of hand-woven, and bits of the wool as quilt batting. I’ve marveled at the fineness of the singles, noticing that the normal weaving sett appears to be 30-36 ends per inch. That translates into a single of about 60-70 wraps per inch! Remarkable indeed for a medium fleece. That same fleece would have been used for knitting yarns, of course, after plying.
There was little variation in materials for spinning in the Appalachia of the late 19th and early 20th centuries. Local wool and your portion of a bale of cotton purchased every year or two was interspersed with local flax. Those lucky enough to have ‘bottom’ land could trade their extra flax and wool to neighbors or perhaps a local store; others had to make do with what they could raise on the scrubby, sometimes slag-poisoned hillsides behind their cabins.
Spinning wheels were primitive by our standards; hand-made, single-treadle, with hand-carved flyers and a few bobbins of variable balance and size. Flyer hooks were bent nails salvaged from other projects – metal was expensive. Orifices and axles might be salvaged metal, but were just as likely to be wood wedged firmly into leather bearings greased with lard. Treadle tie-ups were sometimes leather strips, most times string. Wheels were noisy, too; conversations while spinning were likely to be shouted over the squeak and squeal of wood against wood. The sophistication of the spinner’s wheel was completely dependent upon the woodworking and metalworking skills of her husband, father or brother. Those with the skill to make ‘good’ spinning wheels, looms and quilting frames were likely to have a profitable sideline to their miner’s paycheck if they could come up with the energy to make tools after a 12- to 16-hour day in the mines. But even then the most profitable trading items would have been plows, harnesses, shingles and buckets.
“Profitable” is a relative term, of course. Cash money was rare in that time and place. Miners were paid in scrip redeemable only at the company store, where prices were high. “Tradin” is the term my great-grandparents and grandparents used for shopping, and is a better term for the actual exchange of goods in that place and time. That type of bartering is now used mostly between craftspeople; little exchange of services and tools is “traded” in the day-to-day scheme of modern living. This has little to do with historical spinning except as background material, of course.
One of the main reasons women like my great-grandmother could spin 60-70 wpi singles from medium wool was that they were expert spinners of that type of wool. Remember the types of fiber available? Cotton was imported from further south, with a 500-pound bale divided up among an entire community. It was precious and expensive, and so saved for ‘special’. Linen was a local crop, dependent upon rains and the disinterest of insects. It was also labor-intensive, requiring time-consuming processing before spinning. Wool was the most readily-available fiber, coming from your own sheep or bartered for locally. In any case, you probably spun the same type of wool year in and year out for your entire lifetime.
Wheels were more specific-purpose than those we use now, having at most two ratios – about 7:1 for wool and linen and 12:1 for cotton. Most had only a single ratio, and the spinner adjusted her spinning to suit. Spinning was an integral part of the daily chores, and the less time spent on each yard the more time available for weaving, cooking, canning and cleaning. High-twist yarns were made, but only for warps and high-wear applications like socks. Those high-twist yarns were carefully segregated from the weft and general knitting yarns, which were lower-twist yarns, normally from lower-quality parts of the fleece.
Oh, and before you ask, I’ll answer the question of whether drop spindles were part of life in Appalachia. My grandmother laughed the first time she saw me use a drop spindle, a year or so in advance of the conversation related earlier. “I haven’t seen one of those since I was a girl!” was her comment. “How good are you with it?” I showed her what I was spinning, and she wasn’t impressed – just surprised that I was using that particular tool. When I laid my top-whorl spindle on the table to reach for the coffee cup, she picked it up and immediately spun a few yards that exactly matched the lace-weight singles I had begun. “You know, when I was little I used to be sure this was magic,” she commented. “Then I learned to do it!”
I was a bit surprised, since I’d never seen my grandmother spin at all, let alone on a spindle! And magic was a word I don’t recall her ever using before – miracle, yes, magic, no! Further conversation revealed that drop spindles were made for all the children at about age 5, just as wooden knitting needles were whittled for all the girls (and some of the boys) at about the age of 6. Once you were a proficient spinner, you could take your turn on the family wheel, but the spindle and a bit of fleece (or a bit of knitting) was almost always tucked into an apron pocket for odd moments. Obviously it isn’t a knack you forget, since my grandmother estimated that it had been about 60 years since she had picked up a spindle. Hers had been carved from apple wood, she said, and was a bottom-whorl with a notch at the top. “Did you keep it?” I asked, anxious to know if this relic of her childhood had survived. “Goodness, no,” she replied. “It’s been gone a long time!” My face must have fallen, because she next said, “Your uncles could probably make you one, if you asked. Or you could whittle it yourself.” Of course I could – although I probably won’t. I would, however, love to have had the tool she used as a child!
Between 1860 and 1920, metal tools were expensive, but a considerable portion of the yearly family income went toward maintenance and any necessary replacements. Clothing was as necessary as shelter and food, and equally home-made. Metal spinning wheel axles and bobbin shafts, metal-teethed cards, and metal pins, needles and knitting needles, among other things, were frequently gifts for very special life occasions like marriage or perhaps graduation (education wasn’t easy to come by and took considerable effort). Those tools were scrupulously maintained. Rust on a needle was a sure sign of a slipshod personality, and as unacceptable in that society as rust on a plow. I’ll always remember my grandfather’s scathing denouncement of a proposed daughter-in-law, “You can’t marry her - she don’t even know how to use the emery bud on a pincushion!” It was the ultimate dismissal.
Dyes were another luxury item. Many dyes were obtained from natural stuff, of course, and the Appalachian Mountains abound in patches of madder and other non-native dye plants planted around old cabin sites. Synthetic dyes were available by 1900, but equally important (and less expensive) were indigo cakes. I still saw them in the country stores in northeast Tennessee when I was a child in the 1950’s and 60’s.
It’s hard now to realize, but dyes were important indicators of wealth and influence. I’ve heard stories all my life about the crimson wool wedding dress worn by a great-grandmother, and how her husband-to-be had sent for the ground cochineal used to dye the wool from his father’s relatives on an Indian reservation in the Southwest. Now those stories draw little attention from my children and grandchildren – we’ve come too far from those rural roots where independence and self-sufficiency were the measure of a family’s worth.
Modern spinners don’t concentrate on a few specific types of fiber to the degree of our ancestors. We’re by and large hobbyist spinners, producing yarn for our own or a limited number of consumers’ use. We can choose fibers from all over the world, in mixtures that would astonish my great-grandmother. The average spinner in a so-called developed country spins fibers every day that were unobtainable luxury even three decades ago – well within our adult life spans.
Our wheels are works of art and engineering, and almost as multiple-purpose as our kitchen appliances. We can spin cotton, flax, wool, alpaca, yak and cashmere on the same wheel, moving a drive band from whorl to whorl to adjust the ratio.
Dyes can be synthetic, natural, or concentrated crystals in several preparations. They’re easy to use; mordants are either unnecessary or available in easy to use forms from the same vendors from whom we purchase the dyes, and the resulting colors are light- and wash-fast.
It is no longer necessary to spin every inch of yarn or thread for every inch of fabric we use each day. So we get less spinning practice than did our forbearers. We have more articles of clothing than anyone except the very wealthy did even a hundred years ago, and spend a considerably smaller proportion of our income to obtain those clothes. So spinning is now a hobby, not a necessity.
Are we therefore less-accomplished spinners than were our ancestors? Yes and no. We tend to be more comfortable with multiple fiber staples, and spin our wealth of fibers into various weights and in various blends for specialized purposes. We seldom concentrate on one or two fibers to the exclusion of any others. This means that we lose the ability to ‘make-do’ with fibers that may not be perfectly suited to our end use. But to my mind, the wide-ranging fiber education we receive balances the scales nicely. We may not be more practiced spinners than our great-grandmothers, but we’re definitely better-educated ones!
We have, as a society, more disposable income than at any time during human history. We treasure our leisure time as an opportunity to pursue our avocations. We tend to spend “extra” money on those same avocations, whether spinning or trout-fishing. Combine those facts with the rapid transit and better communication of 2006, and you can see that the fiber explosion of the past fifteen years or so was inevitable. Spinners, knitters, quilters and other fiber artists both amateur and professional are taking full advantage of this wealth of materials. I am no different from the rest, enjoying the time invested in learning basic techniques of spinning new-to-me fibers like yak, buffalo down, ingeo and tencel.
Eventually, I predict that the pendulum will swing back the other way, and spinners will ‘specialize’ in certain fibers – in fact, some are already doing so. But whatever our individual choice in the matter, we should remember that we live in a time where spinning is a choice, not a necessity, and thus comes under the heading of luxury. Nobody must spin these days in order to clothe a family. We choose to spin for a multitude of reasons. The fact that spinning is now a choice is what moves it from the category of necessity to luxury.
I can’t help but wonder if spinning historians in the future will look at our current exploration of many different fibers as a sort of aberration, unable to fathom why we rush to try every new fiber available. I can hear my own grandchild asking, thirty or forty years from now, “But why didn’t you concentrate on the sheep’s wool, alpaca and llama that were all around you instead of buying exotic fiber from someplace on the other side of the world?” Or perhaps, with advances in cheap transportation, the question will be slightly different – “Why did you have to buy the fiber from a vendor across the country? Why not just go to Tibet (Australia, Indonesia, South America) and buy it directly from the grower?”
The only unchanged thing in the conversation will be the tools we’re both using while we talk – the spinning wheel and the drop spindle will still be the way we soothe our minds and busy our fingers. The quiet click of knitting needles or tatting shuttles will still accompany our evening rituals. Fiber will still be available to spin, and spinners will still exist. Because there is no substitute for the magic of watching fibers slip through your fingers to become yarn. It mimics creation itself, this yarn spun from the ethereal gossamer web of fiber and air. True magic will always be part of humanity, and spinning is absolutely true magic.
My grandmother, shortly before her death, saw some of my earliest alpaca/silk blend handspun. She was astonished at the softness, shine and clarity of color. One of the comments she made was “I wish Mother could have felt this!”
I pursued the comment just a bit, but Grandma was weak, and had little to say except that the sheep’s wool spun during her young years by her mother was prickly and rather harsh. The finest stuff was from the neck area of the sheep, and even that was rather stiff. Her final comment was that her girlhood socks always made her legs itch.
I’ve done a bit of back-tracking, collecting recollections and reminiscences from relatives and neighbors, trying to find out what sort of sheep Great-Grandma was most likely to have had access to as a spinner. The best guess to date is a cross of Shropshire and Shetland or Romney. These sheep did fairly well as wool producers and lambs provided a helpful dose of protein for the diet of hill farmers and coal miners. The wool would have probably been a medium type, with a Bradford count in the 50s, especially given the diet of scrub brush and hill grass available in that place and time. So Grandma probably did have scratchy socks!
I’ve seen bits and pieces of the various fabrics made from this wool; as quilt pieces and scrap bits of hand-woven, and bits of the wool as quilt batting. I’ve marveled at the fineness of the singles, noticing that the normal weaving sett appears to be 30-36 ends per inch. That translates into a single of about 60-70 wraps per inch! Remarkable indeed for a medium fleece. That same fleece would have been used for knitting yarns, of course, after plying.
There was little variation in materials for spinning in the Appalachia of the late 19th and early 20th centuries. Local wool and your portion of a bale of cotton purchased every year or two was interspersed with local flax. Those lucky enough to have ‘bottom’ land could trade their extra flax and wool to neighbors or perhaps a local store; others had to make do with what they could raise on the scrubby, sometimes slag-poisoned hillsides behind their cabins.
Spinning wheels were primitive by our standards; hand-made, single-treadle, with hand-carved flyers and a few bobbins of variable balance and size. Flyer hooks were bent nails salvaged from other projects – metal was expensive. Orifices and axles might be salvaged metal, but were just as likely to be wood wedged firmly into leather bearings greased with lard. Treadle tie-ups were sometimes leather strips, most times string. Wheels were noisy, too; conversations while spinning were likely to be shouted over the squeak and squeal of wood against wood. The sophistication of the spinner’s wheel was completely dependent upon the woodworking and metalworking skills of her husband, father or brother. Those with the skill to make ‘good’ spinning wheels, looms and quilting frames were likely to have a profitable sideline to their miner’s paycheck if they could come up with the energy to make tools after a 12- to 16-hour day in the mines. But even then the most profitable trading items would have been plows, harnesses, shingles and buckets.
“Profitable” is a relative term, of course. Cash money was rare in that time and place. Miners were paid in scrip redeemable only at the company store, where prices were high. “Tradin” is the term my great-grandparents and grandparents used for shopping, and is a better term for the actual exchange of goods in that place and time. That type of bartering is now used mostly between craftspeople; little exchange of services and tools is “traded” in the day-to-day scheme of modern living. This has little to do with historical spinning except as background material, of course.
One of the main reasons women like my great-grandmother could spin 60-70 wpi singles from medium wool was that they were expert spinners of that type of wool. Remember the types of fiber available? Cotton was imported from further south, with a 500-pound bale divided up among an entire community. It was precious and expensive, and so saved for ‘special’. Linen was a local crop, dependent upon rains and the disinterest of insects. It was also labor-intensive, requiring time-consuming processing before spinning. Wool was the most readily-available fiber, coming from your own sheep or bartered for locally. In any case, you probably spun the same type of wool year in and year out for your entire lifetime.
Wheels were more specific-purpose than those we use now, having at most two ratios – about 7:1 for wool and linen and 12:1 for cotton. Most had only a single ratio, and the spinner adjusted her spinning to suit. Spinning was an integral part of the daily chores, and the less time spent on each yard the more time available for weaving, cooking, canning and cleaning. High-twist yarns were made, but only for warps and high-wear applications like socks. Those high-twist yarns were carefully segregated from the weft and general knitting yarns, which were lower-twist yarns, normally from lower-quality parts of the fleece.
Oh, and before you ask, I’ll answer the question of whether drop spindles were part of life in Appalachia. My grandmother laughed the first time she saw me use a drop spindle, a year or so in advance of the conversation related earlier. “I haven’t seen one of those since I was a girl!” was her comment. “How good are you with it?” I showed her what I was spinning, and she wasn’t impressed – just surprised that I was using that particular tool. When I laid my top-whorl spindle on the table to reach for the coffee cup, she picked it up and immediately spun a few yards that exactly matched the lace-weight singles I had begun. “You know, when I was little I used to be sure this was magic,” she commented. “Then I learned to do it!”
I was a bit surprised, since I’d never seen my grandmother spin at all, let alone on a spindle! And magic was a word I don’t recall her ever using before – miracle, yes, magic, no! Further conversation revealed that drop spindles were made for all the children at about age 5, just as wooden knitting needles were whittled for all the girls (and some of the boys) at about the age of 6. Once you were a proficient spinner, you could take your turn on the family wheel, but the spindle and a bit of fleece (or a bit of knitting) was almost always tucked into an apron pocket for odd moments. Obviously it isn’t a knack you forget, since my grandmother estimated that it had been about 60 years since she had picked up a spindle. Hers had been carved from apple wood, she said, and was a bottom-whorl with a notch at the top. “Did you keep it?” I asked, anxious to know if this relic of her childhood had survived. “Goodness, no,” she replied. “It’s been gone a long time!” My face must have fallen, because she next said, “Your uncles could probably make you one, if you asked. Or you could whittle it yourself.” Of course I could – although I probably won’t. I would, however, love to have had the tool she used as a child!
Between 1860 and 1920, metal tools were expensive, but a considerable portion of the yearly family income went toward maintenance and any necessary replacements. Clothing was as necessary as shelter and food, and equally home-made. Metal spinning wheel axles and bobbin shafts, metal-teethed cards, and metal pins, needles and knitting needles, among other things, were frequently gifts for very special life occasions like marriage or perhaps graduation (education wasn’t easy to come by and took considerable effort). Those tools were scrupulously maintained. Rust on a needle was a sure sign of a slipshod personality, and as unacceptable in that society as rust on a plow. I’ll always remember my grandfather’s scathing denouncement of a proposed daughter-in-law, “You can’t marry her - she don’t even know how to use the emery bud on a pincushion!” It was the ultimate dismissal.
Dyes were another luxury item. Many dyes were obtained from natural stuff, of course, and the Appalachian Mountains abound in patches of madder and other non-native dye plants planted around old cabin sites. Synthetic dyes were available by 1900, but equally important (and less expensive) were indigo cakes. I still saw them in the country stores in northeast Tennessee when I was a child in the 1950’s and 60’s.
It’s hard now to realize, but dyes were important indicators of wealth and influence. I’ve heard stories all my life about the crimson wool wedding dress worn by a great-grandmother, and how her husband-to-be had sent for the ground cochineal used to dye the wool from his father’s relatives on an Indian reservation in the Southwest. Now those stories draw little attention from my children and grandchildren – we’ve come too far from those rural roots where independence and self-sufficiency were the measure of a family’s worth.
Modern spinners don’t concentrate on a few specific types of fiber to the degree of our ancestors. We’re by and large hobbyist spinners, producing yarn for our own or a limited number of consumers’ use. We can choose fibers from all over the world, in mixtures that would astonish my great-grandmother. The average spinner in a so-called developed country spins fibers every day that were unobtainable luxury even three decades ago – well within our adult life spans.
Our wheels are works of art and engineering, and almost as multiple-purpose as our kitchen appliances. We can spin cotton, flax, wool, alpaca, yak and cashmere on the same wheel, moving a drive band from whorl to whorl to adjust the ratio.
Dyes can be synthetic, natural, or concentrated crystals in several preparations. They’re easy to use; mordants are either unnecessary or available in easy to use forms from the same vendors from whom we purchase the dyes, and the resulting colors are light- and wash-fast.
It is no longer necessary to spin every inch of yarn or thread for every inch of fabric we use each day. So we get less spinning practice than did our forbearers. We have more articles of clothing than anyone except the very wealthy did even a hundred years ago, and spend a considerably smaller proportion of our income to obtain those clothes. So spinning is now a hobby, not a necessity.
Are we therefore less-accomplished spinners than were our ancestors? Yes and no. We tend to be more comfortable with multiple fiber staples, and spin our wealth of fibers into various weights and in various blends for specialized purposes. We seldom concentrate on one or two fibers to the exclusion of any others. This means that we lose the ability to ‘make-do’ with fibers that may not be perfectly suited to our end use. But to my mind, the wide-ranging fiber education we receive balances the scales nicely. We may not be more practiced spinners than our great-grandmothers, but we’re definitely better-educated ones!
We have, as a society, more disposable income than at any time during human history. We treasure our leisure time as an opportunity to pursue our avocations. We tend to spend “extra” money on those same avocations, whether spinning or trout-fishing. Combine those facts with the rapid transit and better communication of 2006, and you can see that the fiber explosion of the past fifteen years or so was inevitable. Spinners, knitters, quilters and other fiber artists both amateur and professional are taking full advantage of this wealth of materials. I am no different from the rest, enjoying the time invested in learning basic techniques of spinning new-to-me fibers like yak, buffalo down, ingeo and tencel.
Eventually, I predict that the pendulum will swing back the other way, and spinners will ‘specialize’ in certain fibers – in fact, some are already doing so. But whatever our individual choice in the matter, we should remember that we live in a time where spinning is a choice, not a necessity, and thus comes under the heading of luxury. Nobody must spin these days in order to clothe a family. We choose to spin for a multitude of reasons. The fact that spinning is now a choice is what moves it from the category of necessity to luxury.
I can’t help but wonder if spinning historians in the future will look at our current exploration of many different fibers as a sort of aberration, unable to fathom why we rush to try every new fiber available. I can hear my own grandchild asking, thirty or forty years from now, “But why didn’t you concentrate on the sheep’s wool, alpaca and llama that were all around you instead of buying exotic fiber from someplace on the other side of the world?” Or perhaps, with advances in cheap transportation, the question will be slightly different – “Why did you have to buy the fiber from a vendor across the country? Why not just go to Tibet (Australia, Indonesia, South America) and buy it directly from the grower?”
The only unchanged thing in the conversation will be the tools we’re both using while we talk – the spinning wheel and the drop spindle will still be the way we soothe our minds and busy our fingers. The quiet click of knitting needles or tatting shuttles will still accompany our evening rituals. Fiber will still be available to spin, and spinners will still exist. Because there is no substitute for the magic of watching fibers slip through your fingers to become yarn. It mimics creation itself, this yarn spun from the ethereal gossamer web of fiber and air. True magic will always be part of humanity, and spinning is absolutely true magic.
Wednesday, February 22, 2006
A knitting update and a rumination on passing 50

This is another EZ Baby Surprise Jacket, done in Kansas City Chiefs colors for the new baby of a fan. I actually work with both parents - Mom and Dad! Aren’t the colors pretty?
Yarn was KnitPicks Merino Style, needles size 3 bamboo circulars, gauge 5 stitches per inch. The buttons are cute - little balloons! The cener one is actually red, although it doesn't show up too much in the photo.
I did enjoy doing this pattern, and even enjoyed it the second time around - unlike my usual "do it once and never again" style! But I'm really looking forward to getting back to some spinning. I'm in the mood to make some more socks - this time from handspun silk/Romney blended together and hand-dyed.
On the knitting front, I think I'm going to make myself a sweater. I decided to frog the Pi shawl - it wasn't turning out to be an enjoyable, engaging project. I may pick up another variation again some day, or come up with a project I like better for the yarn. For now I'm determined to finish up a sweater that I'll actually wear and enjoy. It's time to conquer my remaining fitting demons!
I think firmly turning the corner into my fifties is helping me concentrate. I'm not as worried about completing something just because I started it. If I don't enjoy the process, and am not learning anything from it, I don't seem to feel that it's necessary to finish it. Learning new skills, refining older ones, and enjoying how I spend my time, both at work and at home, is more important to me now. I'm becoming better and better at saying "No," and I no longer feel guilty for doing so. "You really ought to..." and "Don't you think you should..." are my publically-acknowledged least-favorite phrases at long last, and it's wonderfully freeing!
There's something to be said for a little bit of age - if nothing else, you learn to value yourself and to value your time. You also start to realize that you only have so much time remaining. I think that this sense of my own value is the truest sign that I've finally, truly grown up. It's kind of a shame I didn't realize this 20 years ago - but I've still got plenty of years ahead, and I plan to enjoy them! Watch out, world - I'm over fifty, feisty and a certified fiberholic!
Tuesday, February 14, 2006
Baby sweaters!
I’ve been working on a baby outfit or two recently. The first shower was last week, and I can now ‘publish’ my work for it without spoiling the surprise. The second installment will come later this month. The picture of the finished cap, socks and sweater is below:
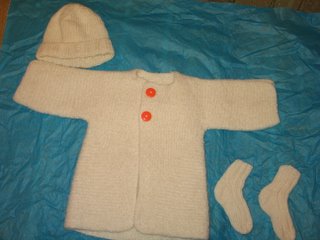
The fiber was Finn top, combed from a fleece purchased I don’t remember when from I don’t remember who. I spun a fingering-weight two-ply on the 9:1 ratio of my Rose, plying for a balanced yarn. The yarn was wonderful – lofty and soft, as Finn should be. The cap was a simple ribbed-edging cap, with decreases at the top. Socks were made from a pattern that the mother-to-be had found somewhere on-line. There’s a story behind them. Momma was one of my knitting students this fall. Our second class project was socks. She wanted to make socks for the baby, but zoned out during the obligatory gauge lecture and didn’t read the material in the hand-out. All experienced knitters know where this is going! Momma does, however, have lovely worsted-weight mohair-blend socklets for the labor and delivery rooms that fit her perfectly!
The sweater will also be readily recognized as Elizabeth Zimmerman’s Baby Surprise Jacket. I hadn’t made this pattern in years, and had forgotten just how much fun it is to knit. I got something of a surprise while working on this one. I had hauled it along to work one day, and on the way home stopped to help out with a church supper. One of the older widowers in the group waxed quite nostalgic about the pattern, recognizing it immediately upon seeing it. His wife, who was a good friend of my mother’s, was a prolific knitter who had made the sweater many times for the babies in a large family. He was delighted to see that it was still being made!
Knitting makes so many people who don’t even knit happy!
The fiber was Finn top, combed from a fleece purchased I don’t remember when from I don’t remember who. I spun a fingering-weight two-ply on the 9:1 ratio of my Rose, plying for a balanced yarn. The yarn was wonderful – lofty and soft, as Finn should be. The cap was a simple ribbed-edging cap, with decreases at the top. Socks were made from a pattern that the mother-to-be had found somewhere on-line. There’s a story behind them. Momma was one of my knitting students this fall. Our second class project was socks. She wanted to make socks for the baby, but zoned out during the obligatory gauge lecture and didn’t read the material in the hand-out. All experienced knitters know where this is going! Momma does, however, have lovely worsted-weight mohair-blend socklets for the labor and delivery rooms that fit her perfectly!
The sweater will also be readily recognized as Elizabeth Zimmerman’s Baby Surprise Jacket. I hadn’t made this pattern in years, and had forgotten just how much fun it is to knit. I got something of a surprise while working on this one. I had hauled it along to work one day, and on the way home stopped to help out with a church supper. One of the older widowers in the group waxed quite nostalgic about the pattern, recognizing it immediately upon seeing it. His wife, who was a good friend of my mother’s, was a prolific knitter who had made the sweater many times for the babies in a large family. He was delighted to see that it was still being made!
Knitting makes so many people who don’t even knit happy!
Tuesday, February 07, 2006
Frog-Hair and Hamster Floss
I love to spin, and prefer to spin fine. Show me or allow me to purchase a very fine Shetland, Merino, or merino cross fleece and my mind happily explores the possibilities while my fingers are busily at work seeing just how fine I can spin this particular fleece. I bought my current spinning wheels based largely on their ability to spin very fine yarns in a wide variety of fibers. I’ve even been known to forsake my wheels entirely in order to spin the very finest of yarns on light-weight spindles.
Why do I have this fascination with fine spinning? Possibly it’s tied together with my love of lace; the most ethereal of knitted laces are made with gossamer yarns that are little thicker than 6 to 8 fibers twisted together into two plies. Maybe I just like the attention it garners at public demonstrations and from other spinners. I don’t know why I enjoy it so much, but I do.
Every spinner is different. We bring different experiences, expectations, tools and physical limitations to our yarn production. I’m not going to take photos or videos of my own spinning method and try to tell you that this is the only (or even the best) way to produce gossamer yarns. I am going to tell you the various steps I go through and the equipment I use to do so. But your methods will almost certainly differ in several particulars. That doesn’t matter. What matters is that you like the yarn you’re making, and find it suitable for your purposes. Modern individuals seem to expect a ‘recipe’ approach, and I don’t really do ‘recipes’ for spinning any more than I do for knitting, weaving, or cooking. Still I hope interested spinners will locate these notes, find them somewhat useful, and explore the possibilities further.
First and foremost, choose a fine, sound fleece. No mid-range fleeces (Lincoln lamb, Romney crosses and Wensleydale all have their uses, but in my opinion this isn’t one of them), and no weak spots or sun-bleached tips. Shetland lamb fleece, fine merino or merino crosses like Rambouillet or Targhee, fine Finn…you get the idea. You’ll spend a bit more for these fleeces, and they’ll be worth every penny. If you can find them in combed top from commercial sources, go for it – you’ll pay around $8.00 per ounce, but you can get a 60-inch square shawl from 4-6 ounces of top.
My current fine-spinning champ is a Shetland lamb fleece from a shepherd in Ohio. Staple length is between 4 and 5 inches, fineness is between 13 and 15 microns, crimp is moderate. Unfortunately the sheep wasn’t coated and I lost way too much of this beautiful fleece to burrs and hayseed contamination, but what’s left is lovely. On a 15-gram drop spindle my singles are in the 95 wpi range. On the wheel, the best I can manage is 75-80 wpi singles.
I can hear the next question – how do I prep a fleece for this sort of fine spinning? If you want the finest yarn you have to choose the finest portions of the fleece. That takes going over a fleece almost lock-by-lock. So my first step is to move outdoors and spread the fleece out on an old sheet on an overcast day. I have a deck that’s ideal for this, since the breezes are blocked by the house itself, built-in seating and almost-solid side panels.
I use two sheets and a small laundry basket. Sitting between them, I take a handful of fleece from the skirted fleece and pick through it. Average locks go onto the second sheet; really fine locks go into the basket. If you’ve laid out the fleece in such a way that you can discern the various parts like neck, saddle, back, belly and legs it will go faster. Unfortunately, this isn’t always easy to do, and you will frequently have to simply try your best to get the entire fleece laid out in a single layer. Either way, start at one end of the fleece and work your way through. Take your time. This can easily and pleasantly consume an entire afternoon, so ship the husband and children off for that length of time – they can go fishing or play in the park.
Once you’ve separated the fleece, keep it that way. Store the ‘average’ portion (which may be pretty fantastic, but isn’t the absolute tip-top portion of the fleece) in your favorite container, either washed or in the grease. Take appropriate measures for moth and critter control. Then move on to your basket containing the best of this fleece. You’ll be surprised at how little wool you have in there – if there’s more than 6-8 ounces you have a truly spectacular fleece!
You can, of course, comb or flick the contents of the basket and spin at this point. I don’t really care for spinning in the grease, and find spinning this sort of relatively high-twist yarn in the grease makes it quite difficult to get the resulting yarn clean. But it’s your choice.
If you choose to clean the fleece before spinning, you’ll want to do so in a way that keeps the lock structure as intact as possible. There are two really good possibilities. Many spinners favor laying the locks out on a strip of netting or illusion about 18 inches wide and 36 inches long, folding the netting over the locks to form a sandwich, and running either a line of basting stitches or safety pins through the layers to keep the locks intact. Others roll the netting sandwich, fasten with a rubber band or string, and then wash. I’ve tried both, and had problems with getting the fleece completely clean. That may have more to do with my rather hard water than any failing in the method, since friends with soft water get perfectly good results.
The second way is to do it by hand, lock by lock, and this is my preferred method. The locks are perfectly clean and well-preserved. I set up an assembly line, starting with two large pasta pots of water brought to a boil on the stove. On the counter are the basket of fleece, three dishpans (or one dishpan and the double sink) and a large towel or three at the far end. Laundry detergent is close at hand, along with a candy thermometer and thick rubber gloves.
Put 3-4 inches of the hottest water you can get from the tap into the first container. Mix in enough detergent to make the water feel slippery (I use about 1 cup of liquid detergent). Now add boiling water from the stove until the water temperature is between 160 and 180 degrees on the candy thermometer. Make up the other two containers with water of the same temperature, but without detergent. Now start more water on the stove – you’ll probably need it to replenish as you go along. In order to clean fleece well the main thing necessary is HOT water. So keep it at least 160 degrees.
Put on the gloves and pick up the first lock. Lay it in the dishpan of soapy water. Don’t let it drift apart as it gets wet, though – you want to swish it through the water just enough so that the lock gets clean, but not so much that it begins to felt. Now remove it from the soapy water and do the same thing in each of the rinse containers. Lay the lock on the towel to begin to dry, go back and do the same thing again with the next lock.
Sound tedious? It can be if you’re working on a surface of the wrong height, but as long as your ‘washing station’ is set up properly it isn’t too bad. And when finished you have rows of beautifully clean locks on the towels. I place the towels in the basement on a drying rack made from an old window screen laid across sawhorses with the locks still on them – everything is dry by the next day. Then I pick up each lock and put it back into the cleaned basket, ready for spinning.
While the clean locks are drying is a good time to go over your tools. If you plan on flick-carding (and that’s the best way I’ve found to spin frog-hair), make sure your flicker or dog comb is at hand and clean. Find or make a lap cloth that’s thick enough to withstand the flicking and protect your leg. I use a tripled piece of heavy cotton-twill cloth – one side white, one side medium blue, and an extra layer in the middle – that’s about a yard square. Edges are serged together and corners are rounded. So far it’s worked well, especially if I wear denim or some other heavy twill skirt or jeans. A piece of leather will also work well.
Is this necessary? Perhaps not – but the one time I tried flicking locks without any protection between the flicker and my leg I got a very interesting pattern of puncture wounds and a tetanus shot. It served me right for agreeing at the last minute to do a public demonstration on a just-sheared grease fleece from a local flock.
If you’re spindle-spinning, try out your spindle and do any tweaking necessary. If you’re using a wheel, this is the perfect time for a tune-up. Check all the nuts, bolts and screws and make sure they’re tight. Check the alignment of the drive wheel and whorl – is your drive band traveling in a straight line? Clean the wheel well, polish any finished wood parts, and be sure you lubricate any place necessary – don’t forget the bar that supports your treadles. If you use leather, lubricate that and tighten any leather ties.
Check your tensioning system to be sure it is working well. On double-drive wheels you’ll want to change over to a fine, smooth linen or cotton drive band. Try them out until you find something that will just turn everything smoothly. This seems silly, perhaps, but it will help. Thick drive bands can sometimes be a little too grabby for spinning really fine yarns, breaking the yarn frequently. I’ve had the best luck with size 10 or 20 crochet cotton. I’ve occasionally had to use beeswax on the drive bands, but not very often; first try it without.
On Scotch-tension wheels, try to get the lightest spring available. You don’t want something stiff enough to pull on bulky-weight singles. Check on your wheel manufacturer’s website, or in the hardware section of your local home center. You want something made from fine-gauge wire with about 1/16 inch between each wrap. That will give you the absolute minimum tension on the take-up band. Change your brake band to something very light and fine. I use braided fishing line in a 30-pound test size, and have never had a problem. I change it out every couple of years when it becomes frayed. If your tensioning knob is loose, wrap a bit of fiber around the portion that goes into the mother-of-all or the table to provide some grab, or rough up the surface a bit with a wood or nail file. But be careful with this - you don’t want to overdo it! What you’re after is fine control, not a tensioning knob that no longer fits the hole drilled for it!
Fine yarns have less tensile strength because they have fewer fibers. You need to compensate for that. A large-core lace bobbin puts less strain on fine threads, and a lace flyer orifice is smaller in diameter so that the threads vibrate less as they go through. If you don’t have a lace flyer and bobbin, try some of the following hints:
To make a temporary lace bobbin, pick up some pipe insulation at the hardware store. Cut a length that will fit tightly over the core of your bobbin, snuggling up nicely to the ends. Before you slip it into place, tie a long leader of size 20 crochet cotton around the core. Now slip the pipe insulation over the bobbin core, bringing your leader out through the slit in the insulation. You now have a perfect lace bobbin for an investment of a couple of dollars.
If you have a delta orifice wheel, don’t despair. In my experience Delta orifices actually aren’t too bad for lace yarns. You may need to make no adjustments at all. However, if you start to spin, the yarn snaps every yard or so and you’re using a delta orifice, suspicion is recommended. Look over the wheel again – get another spinner to check it if possible. Adjust take-up, drive bands, etc. and try again. Still having trouble? Check with your wheel manufacturer or a good spinning wheel replacement parts person – you may indeed need a lace flyer in order to spin really fine yarns on that wheel.
Different wheels have different bobbin tensioning systems. I’m particularly thinking about the Louet wheels, but there are almost certainly others out there with a very strong take-up. I don’t own one of them, so all I can advise is to ask questions on the TechSpin list or talk to your dealer. I have seen various hints and tips, but didn’t pay a great deal of attention since they didn’t apply to me. In case you’re wondering, I currently own an Ashford Traveller, a Majacraft Rose and a Kromski Symphony. All are scotch tension or convertible wheels with a double treadle because I like that setup. But that doesn’t mean you have to have one of those wheels to spin gossamer yarn! You can spin fine yarns with any wheel as long as you’re willing to tinker a little and learn how to tweak your own wheel to get the results you want.
Now that your wheel is tuned-up and ready to go, let’s talk about your spinning chair. It should fit not only your body when sitting, but also when spinning. I can’t use a chair with arms, for example – they get in my way. But I do need a chair that’s height-adjustable – all three of my wheels have different-height orifices and ‘live’ on different surfaces, and that means that I do better if I can tweak my seat height. Could I purchase a different chair for each wheel? Yes, but I didn’t. Instead I bought a well-cushioned task chair with excellent, adjustable lumbar support and adjustable seat height and tilt. I move it to whichever wheel I want to use right then.
Be sure to pay attention to the ergonomics of your spinning. When treadling, your knees should remain at 90 degrees to your body. Arm motions should be fluid and as centered as possible. Try to avoid shifting from one hip to another or twisting your spine and you’ll spin with less effort and no backache. Sit comfortably, and don’t forget to get up and move around every 20-30 minutes. I actually set a timer, or make myself get up during commercials if I’m watching TV while spinning.
All right, all the equipment is ready and your locks are dry. Sit in your spinning chair, placing your fiber on one side of your chair (the same side as that of the hand in which you hold your fiber). Put the cover on your lap, pick up your comb or flicker, and get ready to spin some lace-weight yarn.
Grasp a lock of wool at one end – either one. It doesn’t matter too much if you use a dog comb or a flicker. If you’re using a comb, pretend you’re working on a small child’s hair – use smooth movements, starting at the tip and working up to the center of the lock. If using a flicker, don’t brush from lock center to tip – tap the flicker gently with only the slightest of downward strokes, again working from the tips toward the center of the lock. Working this way will break off any brittle tips, work out any tangles, and give you beautifully- aligned fibers.
When the lock is perfectly open, switch ends and do the same from the other end of the lock. I prepare a single lock at a time, spinning immediately after I flick each lock. If you prefer to flick several, that’s fine – stack them on a small table or your lap. But try not to flick more than you’ll spin in a half-hour. They’ll just get disarranged and require flicking again.
You want open, perfectly-aligned locks. If you can’t see your fingers or the lap cloth through the fibers after flicking, separate the lock and work on smaller portions. Remember what you’re after here – no more than 3-8 fibers in your singles yarns. A single lock, which contains well over 150 fibers, will take me somewhere between 5 and 10 minutes to spin.
When you’re ready to begin your singles, attach the leader to the lock of fiber by your preferred method. I start out by tying a slip knot in the leader, threading a half-dozen fibers through the loop, doubling them back on themselves and tightening down the slip-knot loop around the fibers. Then I begin treadling gently clockwise, allowing twist to build up in the doubled fibers, and only begin to draft when they have plenty of twist.
That first lock may spin fairly quickly as you adjust take-up, treadling speed and drafting speed. Don’t worry about it; just continue to thin down the singles until you reach the grist you want. I look at that first lock or two as ‘play time’, and explore possibilities. When I’m sure everything is set up properly, I’ll start to consciously reduce the number of fibers in my drafting triangle.
Hold the fiber lightly. You need to have control over the fiber supply, but you don’t want to have to pull fibers from the supply with your other hand, either. The twist should flow smoothly into the drafting triangle.
Warning: Heresy is about to be written! I do not insist that the inchworm method is the only way to produce even yarns. It is the easiest way for a spinner to gain the control necessary to learn the feel of producing fine yarns, but to me it’s a difficult, tension-inducing way to spin. If you see me spinning inchworm method, you can bet that I’m spinning either a new-to-me fiber or a down fiber such as cashmere. I mostly use what could best be called a modified long-draw method. While this may not produce what a technical purist would call a worsted yarn, the yarn I produce looks and behaves like a worsted yarn. With only a half-dozen fibers at most in the singles, it’s almost impossible to spin anything except a worsted yarn, anyway, especially when using lock-flicking as a preparation method.
I’ve heard it said that you can’t put too much twist into these very fine yarns. I don’t agree. The goal for very fine yarn is the same as that for thicker yarns – soft-feeling, well-wearing yarns for use in making cozy, warm wearables. Yarns that are extremely hard-twist have their uses, i.e. carpets and doilies and some fabrics, but I don’t care for wearing them. Control your twist. Depending on the fiber, you’ll want singles with somewhere between 12 and 25 twists per inch. How do you know how much twist you need? Sample.
There’s no substitute for sampling to gain information. Yes, you can check with other spinners, weigh their answers and decide what you want to do, but you’ll still have to sample. Whether you make a small (short) sample or a full-size sample (an entire bobbin or more of yarn) is up to you. These days I tend to feel that my spinning and knitting time is too short for me to spend it working on an unsuccessful project. It’s much better to spend a small amount of time and materials up front sampling in order to get exactly what I want. In the past, however, I was a card-carrying member of the full-size sample club. Like almost everything else in spinning, the choice is yours.
What sort of information can you gain by sampling? Let’s take a look. You’ve spun an entire lock at 25 wpi. This is a Romney lamb fleece, by the way, with a micron count of about 30 and medium crimp. You want to do a lace-weight shawl, with two-ply yarn of about 30 wpi. You’ve put a medium-fast whorl on your wheel which will give you a ratio of 12:1. The singles are measuring 35 wpi, but your two-ply sample is 20 wpi. You’ve got about 6 fibers in your singles, but the yarn is still larger in grist than you wanted. It feels a bit harsh, as well. How can you decrease the grist and improve the feel? This is where sampling comes in. I’d try the following steps, in order, to try to accomplish it.
First, slow down the wheel. A ratio of 8:1 will give me more time to fiddle with the drafting, and perhaps get 4 fibers down to 3 or even 2. That will decrease the grist. A slower speed may also correct the feel of the yarn, softening it up nicely. A half-lock later you discover that this isn’t working. You’re treadling yourself to death in order to get enough twist in and the yarn is drifting apart. That’s too soft!
All right, speed up the wheel. Perhaps you need a ratio of 20:1. You should be able to control the drafting, and the faster speed will help with the treadling. You’ll have to be careful not to put in too much twist, though, and make the yarn harsh again. Let’s finish up that lock. Nope! This definitely isn’t going to work. Too much twist is making the yarn feel like wire. But the grist is about right – 50 wpi singles.
What’s a good compromise? Do you have a 16:1 whorl? If so, try that. If not, go back to the 12:1 whorl and concentrate on your drafting. After the sampling you’ve done, you may find it easier to control the number of fibers in the drafting zone. You should definitely be able to keep the yarn soft.
All of the above is a process you should make automatic when starting a new spinning project. Play with your fiber for a few minutes. See what you can do with it – how much twist will it accept without turning to wire? How little twist can you put in without the yarn drifting apart? What’s the happy medium that gives you a soft, strong yarn? When you get to that happy medium, is the resulting yarn suited for your project?
Now I’ll let you in on a secret – if you have to go through the above scenario and still compromise to get a usable yarn you’ve probably chosen the wrong fleece. How many of you spotted that? It shouldn’t take that much work to get the yarn you want for a given project once you know something about spinning. Romney lamb can be wonderfully soft, but for the sort of yarn you want, a micron count of 30 is too high. You need something in the 20’s, preferably less than 25. Put the Romney away until you want to make a sweater or some socks. It will be perfect for that, probably spun at that 12:1 ratio and three-plied to a grist of about 16-18 wpi. But if you want a fine lace shawl, try for a Shetland fleece with a micron count in the 20-23 range.
Are there other possibilities? Of course. Shetland is traditional for lace shawls because the fibers are generally fine with an average crimp. So you can spin it fine, knit it into a crisp-appearing lace, and block it severely to show off that lace. The lower crimp will help it hold that blocking until it again gets wet. But Shetland isn’t your only choice. Targhee is a good choice for fine yarns, as are Rambouillet, Cormo, CVM, Polwarth, Romeldale, Bluefaced Leicester, Finn and Corriedale.
The queen of fineness, merino, is easy to spin to gossamer-weight. The best merino spins like butter into a singles of more than 70 wpi. The 20-30 crimps per inch factor can present some challenges with blocking finished items, though. If you choose merino, you should knit your shawl to the finished dimensions and block only gently; it will be wonderfully soft. But if you knit the shawl the usual 15-20% less than the finished dimensions and block it out, three weeks later it will again measure the unblocked dimension, especially if you live in a humid climate. The culprit? That lovely crimp. This can be offset somewhat by blending merino with silk, alpaca, or both. But you still need to sample carefully, block, and measure your blocked sample both immediately and several days later. Surprises aren’t too difficult to cope with before you cast on, but can be quite unwelcome after you’ve cast off!
All right, you’ve chosen the fleece, sorted the locks, washed them and let them dry. You’ve sampled and finally gotten about half of your singles spun – almost a full lace-bobbin of 2 ounces. Stop and put that bobbin aside. Set up another and spin again until it’s full. Put both bobbins on a lazy kate, put a very small amount of tension on the two bobbins, and set the kate well behind your chair on the same side as your lead hand.
Yes, I know you can ply from a ball. I do exactly that quite often with yarns larger than gossamer, since I don’t like to have leftover ends. Leftovers mean splices in the knitting, and I don’t like to splice. But in this case plying from a ball is potentially a huge mistake. You’ve spent a month or more spinning 4 ounces of gossamer singles. Gossamer singles are fragile, and have little tensile strength compared to heavier-grist singles. So don’t add the additional stress of winding into a ball and then unwinding again under variable tension to ply from that ball – they’ll break easily and tangle even more easily! Ply from two bobbins instead – you’ll be happier and won’t lose half your singles to tangles. Ask me how I know - but be prepared for a long tale of woe!
Ply slowly and carefully. I’m not normally the type of spinner who counts every treadle for a given measure of yarn, but when plying this stuff it can be quite helpful. Of course small changes in twist can be corrected when skeining the yarn, but the less you must compensate the better. I usually slow down the wheel when plying; if I’ve spun at a 16:1 ratio I’ll ply at 12:1 in order to give myself time to gently pull the singles from the kate and count the treadle strokes.
You’ve spun the singles on lace bobbins. You can ply on lace bobbins, too, or you can give a regular bobbin a try. The advantage to plying on a regular bobbin is that it should hold an entire 4 ounces of plied yarn (unless your wheel is one of those with smaller-capacity bobbins). So you’ll have no splices or ends with which to contend in the knitting. The same rule of thumb applies, though – if you find your yarn breaking every yard or two, switch to a lace bobbin.
Once the plying is finished, it’s time to skein, tie and wash the finished yarn. I use a 2-yard niddy-noddy, release the bobbin tension and stand about 10 feet away from the wheel with the finished yarn coming over the top of the flyer. Of course, the Majacraft has a sliding yarn guide. When using a wheel with flyer hooks, you may be better served to put your bobbin on a tensioned lazy kate before you start making your skein.
Skein smoothly. Standing some distance away from the bobbin allows any variation in the twist to even out, making for a better yarn. Skein ties should definitely be used for these gossamer yarns. If your usual sport-weight skeins are tied in 2 places, double that on lace-weight and put a tie every foot or so on gossamer yarn. Don’t tie tightly, especially if you plan to dye your yarn. But multiple ties will help keep the yarn untangled through the washing process. I use a smooth, high-twist cotton yarn to tie wool yarns because it’s easy to see and slip off when it’s time to untie.
Wash well in really hot water. You want to get out any remaining dirt from the fleece as well as any spinning oil you’ve used and the oils from your hands. Rinse in hot water, remove excess moisture either by using the spin cycle of the washing machine (but don’t let water spray on the skein) and hang somewhere shady to dry. Weighting the skein shouldn’t be necessary, but you may certainly do so if you prefer.
When my skeins are dry I usually abuse them to full, thicken and soften the yarn slightly. This doesn’t involve anything nearly as drastic as it sounds. I take the skeins and whack them on a table edge a few times, moving my hand-hold (and thus the impact point) around the skein. After that, it’s time to wind the skein or skeins into center-pull balls and start to swatch some of the lovely lace patterns available while dreaming of the finished scarf or shawl.
Hamster floss and frog hair aren’t difficult to spin. They are painstaking, and thus not as soothing as spinning larger-grist yarns. But gossamer yarns have their own sort of meditative quality for those who choose to explore them. And the end result of the process is so beautiful that you find yourself looking for fleeces and tops that can be spun in this manner.
Why do I have this fascination with fine spinning? Possibly it’s tied together with my love of lace; the most ethereal of knitted laces are made with gossamer yarns that are little thicker than 6 to 8 fibers twisted together into two plies. Maybe I just like the attention it garners at public demonstrations and from other spinners. I don’t know why I enjoy it so much, but I do.
Every spinner is different. We bring different experiences, expectations, tools and physical limitations to our yarn production. I’m not going to take photos or videos of my own spinning method and try to tell you that this is the only (or even the best) way to produce gossamer yarns. I am going to tell you the various steps I go through and the equipment I use to do so. But your methods will almost certainly differ in several particulars. That doesn’t matter. What matters is that you like the yarn you’re making, and find it suitable for your purposes. Modern individuals seem to expect a ‘recipe’ approach, and I don’t really do ‘recipes’ for spinning any more than I do for knitting, weaving, or cooking. Still I hope interested spinners will locate these notes, find them somewhat useful, and explore the possibilities further.
First and foremost, choose a fine, sound fleece. No mid-range fleeces (Lincoln lamb, Romney crosses and Wensleydale all have their uses, but in my opinion this isn’t one of them), and no weak spots or sun-bleached tips. Shetland lamb fleece, fine merino or merino crosses like Rambouillet or Targhee, fine Finn…you get the idea. You’ll spend a bit more for these fleeces, and they’ll be worth every penny. If you can find them in combed top from commercial sources, go for it – you’ll pay around $8.00 per ounce, but you can get a 60-inch square shawl from 4-6 ounces of top.
My current fine-spinning champ is a Shetland lamb fleece from a shepherd in Ohio. Staple length is between 4 and 5 inches, fineness is between 13 and 15 microns, crimp is moderate. Unfortunately the sheep wasn’t coated and I lost way too much of this beautiful fleece to burrs and hayseed contamination, but what’s left is lovely. On a 15-gram drop spindle my singles are in the 95 wpi range. On the wheel, the best I can manage is 75-80 wpi singles.
I can hear the next question – how do I prep a fleece for this sort of fine spinning? If you want the finest yarn you have to choose the finest portions of the fleece. That takes going over a fleece almost lock-by-lock. So my first step is to move outdoors and spread the fleece out on an old sheet on an overcast day. I have a deck that’s ideal for this, since the breezes are blocked by the house itself, built-in seating and almost-solid side panels.
I use two sheets and a small laundry basket. Sitting between them, I take a handful of fleece from the skirted fleece and pick through it. Average locks go onto the second sheet; really fine locks go into the basket. If you’ve laid out the fleece in such a way that you can discern the various parts like neck, saddle, back, belly and legs it will go faster. Unfortunately, this isn’t always easy to do, and you will frequently have to simply try your best to get the entire fleece laid out in a single layer. Either way, start at one end of the fleece and work your way through. Take your time. This can easily and pleasantly consume an entire afternoon, so ship the husband and children off for that length of time – they can go fishing or play in the park.
Once you’ve separated the fleece, keep it that way. Store the ‘average’ portion (which may be pretty fantastic, but isn’t the absolute tip-top portion of the fleece) in your favorite container, either washed or in the grease. Take appropriate measures for moth and critter control. Then move on to your basket containing the best of this fleece. You’ll be surprised at how little wool you have in there – if there’s more than 6-8 ounces you have a truly spectacular fleece!
You can, of course, comb or flick the contents of the basket and spin at this point. I don’t really care for spinning in the grease, and find spinning this sort of relatively high-twist yarn in the grease makes it quite difficult to get the resulting yarn clean. But it’s your choice.
If you choose to clean the fleece before spinning, you’ll want to do so in a way that keeps the lock structure as intact as possible. There are two really good possibilities. Many spinners favor laying the locks out on a strip of netting or illusion about 18 inches wide and 36 inches long, folding the netting over the locks to form a sandwich, and running either a line of basting stitches or safety pins through the layers to keep the locks intact. Others roll the netting sandwich, fasten with a rubber band or string, and then wash. I’ve tried both, and had problems with getting the fleece completely clean. That may have more to do with my rather hard water than any failing in the method, since friends with soft water get perfectly good results.
The second way is to do it by hand, lock by lock, and this is my preferred method. The locks are perfectly clean and well-preserved. I set up an assembly line, starting with two large pasta pots of water brought to a boil on the stove. On the counter are the basket of fleece, three dishpans (or one dishpan and the double sink) and a large towel or three at the far end. Laundry detergent is close at hand, along with a candy thermometer and thick rubber gloves.
Put 3-4 inches of the hottest water you can get from the tap into the first container. Mix in enough detergent to make the water feel slippery (I use about 1 cup of liquid detergent). Now add boiling water from the stove until the water temperature is between 160 and 180 degrees on the candy thermometer. Make up the other two containers with water of the same temperature, but without detergent. Now start more water on the stove – you’ll probably need it to replenish as you go along. In order to clean fleece well the main thing necessary is HOT water. So keep it at least 160 degrees.
Put on the gloves and pick up the first lock. Lay it in the dishpan of soapy water. Don’t let it drift apart as it gets wet, though – you want to swish it through the water just enough so that the lock gets clean, but not so much that it begins to felt. Now remove it from the soapy water and do the same thing in each of the rinse containers. Lay the lock on the towel to begin to dry, go back and do the same thing again with the next lock.
Sound tedious? It can be if you’re working on a surface of the wrong height, but as long as your ‘washing station’ is set up properly it isn’t too bad. And when finished you have rows of beautifully clean locks on the towels. I place the towels in the basement on a drying rack made from an old window screen laid across sawhorses with the locks still on them – everything is dry by the next day. Then I pick up each lock and put it back into the cleaned basket, ready for spinning.
While the clean locks are drying is a good time to go over your tools. If you plan on flick-carding (and that’s the best way I’ve found to spin frog-hair), make sure your flicker or dog comb is at hand and clean. Find or make a lap cloth that’s thick enough to withstand the flicking and protect your leg. I use a tripled piece of heavy cotton-twill cloth – one side white, one side medium blue, and an extra layer in the middle – that’s about a yard square. Edges are serged together and corners are rounded. So far it’s worked well, especially if I wear denim or some other heavy twill skirt or jeans. A piece of leather will also work well.
Is this necessary? Perhaps not – but the one time I tried flicking locks without any protection between the flicker and my leg I got a very interesting pattern of puncture wounds and a tetanus shot. It served me right for agreeing at the last minute to do a public demonstration on a just-sheared grease fleece from a local flock.
If you’re spindle-spinning, try out your spindle and do any tweaking necessary. If you’re using a wheel, this is the perfect time for a tune-up. Check all the nuts, bolts and screws and make sure they’re tight. Check the alignment of the drive wheel and whorl – is your drive band traveling in a straight line? Clean the wheel well, polish any finished wood parts, and be sure you lubricate any place necessary – don’t forget the bar that supports your treadles. If you use leather, lubricate that and tighten any leather ties.
Check your tensioning system to be sure it is working well. On double-drive wheels you’ll want to change over to a fine, smooth linen or cotton drive band. Try them out until you find something that will just turn everything smoothly. This seems silly, perhaps, but it will help. Thick drive bands can sometimes be a little too grabby for spinning really fine yarns, breaking the yarn frequently. I’ve had the best luck with size 10 or 20 crochet cotton. I’ve occasionally had to use beeswax on the drive bands, but not very often; first try it without.
On Scotch-tension wheels, try to get the lightest spring available. You don’t want something stiff enough to pull on bulky-weight singles. Check on your wheel manufacturer’s website, or in the hardware section of your local home center. You want something made from fine-gauge wire with about 1/16 inch between each wrap. That will give you the absolute minimum tension on the take-up band. Change your brake band to something very light and fine. I use braided fishing line in a 30-pound test size, and have never had a problem. I change it out every couple of years when it becomes frayed. If your tensioning knob is loose, wrap a bit of fiber around the portion that goes into the mother-of-all or the table to provide some grab, or rough up the surface a bit with a wood or nail file. But be careful with this - you don’t want to overdo it! What you’re after is fine control, not a tensioning knob that no longer fits the hole drilled for it!
Fine yarns have less tensile strength because they have fewer fibers. You need to compensate for that. A large-core lace bobbin puts less strain on fine threads, and a lace flyer orifice is smaller in diameter so that the threads vibrate less as they go through. If you don’t have a lace flyer and bobbin, try some of the following hints:
To make a temporary lace bobbin, pick up some pipe insulation at the hardware store. Cut a length that will fit tightly over the core of your bobbin, snuggling up nicely to the ends. Before you slip it into place, tie a long leader of size 20 crochet cotton around the core. Now slip the pipe insulation over the bobbin core, bringing your leader out through the slit in the insulation. You now have a perfect lace bobbin for an investment of a couple of dollars.
If you have a delta orifice wheel, don’t despair. In my experience Delta orifices actually aren’t too bad for lace yarns. You may need to make no adjustments at all. However, if you start to spin, the yarn snaps every yard or so and you’re using a delta orifice, suspicion is recommended. Look over the wheel again – get another spinner to check it if possible. Adjust take-up, drive bands, etc. and try again. Still having trouble? Check with your wheel manufacturer or a good spinning wheel replacement parts person – you may indeed need a lace flyer in order to spin really fine yarns on that wheel.
Different wheels have different bobbin tensioning systems. I’m particularly thinking about the Louet wheels, but there are almost certainly others out there with a very strong take-up. I don’t own one of them, so all I can advise is to ask questions on the TechSpin list or talk to your dealer. I have seen various hints and tips, but didn’t pay a great deal of attention since they didn’t apply to me. In case you’re wondering, I currently own an Ashford Traveller, a Majacraft Rose and a Kromski Symphony. All are scotch tension or convertible wheels with a double treadle because I like that setup. But that doesn’t mean you have to have one of those wheels to spin gossamer yarn! You can spin fine yarns with any wheel as long as you’re willing to tinker a little and learn how to tweak your own wheel to get the results you want.
Now that your wheel is tuned-up and ready to go, let’s talk about your spinning chair. It should fit not only your body when sitting, but also when spinning. I can’t use a chair with arms, for example – they get in my way. But I do need a chair that’s height-adjustable – all three of my wheels have different-height orifices and ‘live’ on different surfaces, and that means that I do better if I can tweak my seat height. Could I purchase a different chair for each wheel? Yes, but I didn’t. Instead I bought a well-cushioned task chair with excellent, adjustable lumbar support and adjustable seat height and tilt. I move it to whichever wheel I want to use right then.
Be sure to pay attention to the ergonomics of your spinning. When treadling, your knees should remain at 90 degrees to your body. Arm motions should be fluid and as centered as possible. Try to avoid shifting from one hip to another or twisting your spine and you’ll spin with less effort and no backache. Sit comfortably, and don’t forget to get up and move around every 20-30 minutes. I actually set a timer, or make myself get up during commercials if I’m watching TV while spinning.
All right, all the equipment is ready and your locks are dry. Sit in your spinning chair, placing your fiber on one side of your chair (the same side as that of the hand in which you hold your fiber). Put the cover on your lap, pick up your comb or flicker, and get ready to spin some lace-weight yarn.
Grasp a lock of wool at one end – either one. It doesn’t matter too much if you use a dog comb or a flicker. If you’re using a comb, pretend you’re working on a small child’s hair – use smooth movements, starting at the tip and working up to the center of the lock. If using a flicker, don’t brush from lock center to tip – tap the flicker gently with only the slightest of downward strokes, again working from the tips toward the center of the lock. Working this way will break off any brittle tips, work out any tangles, and give you beautifully- aligned fibers.
When the lock is perfectly open, switch ends and do the same from the other end of the lock. I prepare a single lock at a time, spinning immediately after I flick each lock. If you prefer to flick several, that’s fine – stack them on a small table or your lap. But try not to flick more than you’ll spin in a half-hour. They’ll just get disarranged and require flicking again.
You want open, perfectly-aligned locks. If you can’t see your fingers or the lap cloth through the fibers after flicking, separate the lock and work on smaller portions. Remember what you’re after here – no more than 3-8 fibers in your singles yarns. A single lock, which contains well over 150 fibers, will take me somewhere between 5 and 10 minutes to spin.
When you’re ready to begin your singles, attach the leader to the lock of fiber by your preferred method. I start out by tying a slip knot in the leader, threading a half-dozen fibers through the loop, doubling them back on themselves and tightening down the slip-knot loop around the fibers. Then I begin treadling gently clockwise, allowing twist to build up in the doubled fibers, and only begin to draft when they have plenty of twist.
That first lock may spin fairly quickly as you adjust take-up, treadling speed and drafting speed. Don’t worry about it; just continue to thin down the singles until you reach the grist you want. I look at that first lock or two as ‘play time’, and explore possibilities. When I’m sure everything is set up properly, I’ll start to consciously reduce the number of fibers in my drafting triangle.
Hold the fiber lightly. You need to have control over the fiber supply, but you don’t want to have to pull fibers from the supply with your other hand, either. The twist should flow smoothly into the drafting triangle.
Warning: Heresy is about to be written! I do not insist that the inchworm method is the only way to produce even yarns. It is the easiest way for a spinner to gain the control necessary to learn the feel of producing fine yarns, but to me it’s a difficult, tension-inducing way to spin. If you see me spinning inchworm method, you can bet that I’m spinning either a new-to-me fiber or a down fiber such as cashmere. I mostly use what could best be called a modified long-draw method. While this may not produce what a technical purist would call a worsted yarn, the yarn I produce looks and behaves like a worsted yarn. With only a half-dozen fibers at most in the singles, it’s almost impossible to spin anything except a worsted yarn, anyway, especially when using lock-flicking as a preparation method.
I’ve heard it said that you can’t put too much twist into these very fine yarns. I don’t agree. The goal for very fine yarn is the same as that for thicker yarns – soft-feeling, well-wearing yarns for use in making cozy, warm wearables. Yarns that are extremely hard-twist have their uses, i.e. carpets and doilies and some fabrics, but I don’t care for wearing them. Control your twist. Depending on the fiber, you’ll want singles with somewhere between 12 and 25 twists per inch. How do you know how much twist you need? Sample.
There’s no substitute for sampling to gain information. Yes, you can check with other spinners, weigh their answers and decide what you want to do, but you’ll still have to sample. Whether you make a small (short) sample or a full-size sample (an entire bobbin or more of yarn) is up to you. These days I tend to feel that my spinning and knitting time is too short for me to spend it working on an unsuccessful project. It’s much better to spend a small amount of time and materials up front sampling in order to get exactly what I want. In the past, however, I was a card-carrying member of the full-size sample club. Like almost everything else in spinning, the choice is yours.
What sort of information can you gain by sampling? Let’s take a look. You’ve spun an entire lock at 25 wpi. This is a Romney lamb fleece, by the way, with a micron count of about 30 and medium crimp. You want to do a lace-weight shawl, with two-ply yarn of about 30 wpi. You’ve put a medium-fast whorl on your wheel which will give you a ratio of 12:1. The singles are measuring 35 wpi, but your two-ply sample is 20 wpi. You’ve got about 6 fibers in your singles, but the yarn is still larger in grist than you wanted. It feels a bit harsh, as well. How can you decrease the grist and improve the feel? This is where sampling comes in. I’d try the following steps, in order, to try to accomplish it.
First, slow down the wheel. A ratio of 8:1 will give me more time to fiddle with the drafting, and perhaps get 4 fibers down to 3 or even 2. That will decrease the grist. A slower speed may also correct the feel of the yarn, softening it up nicely. A half-lock later you discover that this isn’t working. You’re treadling yourself to death in order to get enough twist in and the yarn is drifting apart. That’s too soft!
All right, speed up the wheel. Perhaps you need a ratio of 20:1. You should be able to control the drafting, and the faster speed will help with the treadling. You’ll have to be careful not to put in too much twist, though, and make the yarn harsh again. Let’s finish up that lock. Nope! This definitely isn’t going to work. Too much twist is making the yarn feel like wire. But the grist is about right – 50 wpi singles.
What’s a good compromise? Do you have a 16:1 whorl? If so, try that. If not, go back to the 12:1 whorl and concentrate on your drafting. After the sampling you’ve done, you may find it easier to control the number of fibers in the drafting zone. You should definitely be able to keep the yarn soft.
All of the above is a process you should make automatic when starting a new spinning project. Play with your fiber for a few minutes. See what you can do with it – how much twist will it accept without turning to wire? How little twist can you put in without the yarn drifting apart? What’s the happy medium that gives you a soft, strong yarn? When you get to that happy medium, is the resulting yarn suited for your project?
Now I’ll let you in on a secret – if you have to go through the above scenario and still compromise to get a usable yarn you’ve probably chosen the wrong fleece. How many of you spotted that? It shouldn’t take that much work to get the yarn you want for a given project once you know something about spinning. Romney lamb can be wonderfully soft, but for the sort of yarn you want, a micron count of 30 is too high. You need something in the 20’s, preferably less than 25. Put the Romney away until you want to make a sweater or some socks. It will be perfect for that, probably spun at that 12:1 ratio and three-plied to a grist of about 16-18 wpi. But if you want a fine lace shawl, try for a Shetland fleece with a micron count in the 20-23 range.
Are there other possibilities? Of course. Shetland is traditional for lace shawls because the fibers are generally fine with an average crimp. So you can spin it fine, knit it into a crisp-appearing lace, and block it severely to show off that lace. The lower crimp will help it hold that blocking until it again gets wet. But Shetland isn’t your only choice. Targhee is a good choice for fine yarns, as are Rambouillet, Cormo, CVM, Polwarth, Romeldale, Bluefaced Leicester, Finn and Corriedale.
The queen of fineness, merino, is easy to spin to gossamer-weight. The best merino spins like butter into a singles of more than 70 wpi. The 20-30 crimps per inch factor can present some challenges with blocking finished items, though. If you choose merino, you should knit your shawl to the finished dimensions and block only gently; it will be wonderfully soft. But if you knit the shawl the usual 15-20% less than the finished dimensions and block it out, three weeks later it will again measure the unblocked dimension, especially if you live in a humid climate. The culprit? That lovely crimp. This can be offset somewhat by blending merino with silk, alpaca, or both. But you still need to sample carefully, block, and measure your blocked sample both immediately and several days later. Surprises aren’t too difficult to cope with before you cast on, but can be quite unwelcome after you’ve cast off!
All right, you’ve chosen the fleece, sorted the locks, washed them and let them dry. You’ve sampled and finally gotten about half of your singles spun – almost a full lace-bobbin of 2 ounces. Stop and put that bobbin aside. Set up another and spin again until it’s full. Put both bobbins on a lazy kate, put a very small amount of tension on the two bobbins, and set the kate well behind your chair on the same side as your lead hand.
Yes, I know you can ply from a ball. I do exactly that quite often with yarns larger than gossamer, since I don’t like to have leftover ends. Leftovers mean splices in the knitting, and I don’t like to splice. But in this case plying from a ball is potentially a huge mistake. You’ve spent a month or more spinning 4 ounces of gossamer singles. Gossamer singles are fragile, and have little tensile strength compared to heavier-grist singles. So don’t add the additional stress of winding into a ball and then unwinding again under variable tension to ply from that ball – they’ll break easily and tangle even more easily! Ply from two bobbins instead – you’ll be happier and won’t lose half your singles to tangles. Ask me how I know - but be prepared for a long tale of woe!
Ply slowly and carefully. I’m not normally the type of spinner who counts every treadle for a given measure of yarn, but when plying this stuff it can be quite helpful. Of course small changes in twist can be corrected when skeining the yarn, but the less you must compensate the better. I usually slow down the wheel when plying; if I’ve spun at a 16:1 ratio I’ll ply at 12:1 in order to give myself time to gently pull the singles from the kate and count the treadle strokes.
You’ve spun the singles on lace bobbins. You can ply on lace bobbins, too, or you can give a regular bobbin a try. The advantage to plying on a regular bobbin is that it should hold an entire 4 ounces of plied yarn (unless your wheel is one of those with smaller-capacity bobbins). So you’ll have no splices or ends with which to contend in the knitting. The same rule of thumb applies, though – if you find your yarn breaking every yard or two, switch to a lace bobbin.
Once the plying is finished, it’s time to skein, tie and wash the finished yarn. I use a 2-yard niddy-noddy, release the bobbin tension and stand about 10 feet away from the wheel with the finished yarn coming over the top of the flyer. Of course, the Majacraft has a sliding yarn guide. When using a wheel with flyer hooks, you may be better served to put your bobbin on a tensioned lazy kate before you start making your skein.
Skein smoothly. Standing some distance away from the bobbin allows any variation in the twist to even out, making for a better yarn. Skein ties should definitely be used for these gossamer yarns. If your usual sport-weight skeins are tied in 2 places, double that on lace-weight and put a tie every foot or so on gossamer yarn. Don’t tie tightly, especially if you plan to dye your yarn. But multiple ties will help keep the yarn untangled through the washing process. I use a smooth, high-twist cotton yarn to tie wool yarns because it’s easy to see and slip off when it’s time to untie.
Wash well in really hot water. You want to get out any remaining dirt from the fleece as well as any spinning oil you’ve used and the oils from your hands. Rinse in hot water, remove excess moisture either by using the spin cycle of the washing machine (but don’t let water spray on the skein) and hang somewhere shady to dry. Weighting the skein shouldn’t be necessary, but you may certainly do so if you prefer.
When my skeins are dry I usually abuse them to full, thicken and soften the yarn slightly. This doesn’t involve anything nearly as drastic as it sounds. I take the skeins and whack them on a table edge a few times, moving my hand-hold (and thus the impact point) around the skein. After that, it’s time to wind the skein or skeins into center-pull balls and start to swatch some of the lovely lace patterns available while dreaming of the finished scarf or shawl.
Hamster floss and frog hair aren’t difficult to spin. They are painstaking, and thus not as soothing as spinning larger-grist yarns. But gossamer yarns have their own sort of meditative quality for those who choose to explore them. And the end result of the process is so beautiful that you find yourself looking for fleeces and tops that can be spun in this manner.
Wednesday, February 01, 2006
Rules
My husband sometimes asks why I read so many different lists every day – several spinning, one tatting, several knitting and a couple of weaving lists deliver digests to me daily. I’ve tried to explain that I find the camaraderie at least as important as the information shared. Although he’s better than the average Joe at understanding how fiber artists and women network and support one another, he still doesn’t always ‘get it.’ But I truly enjoy the lists – the constant intertwining of newcomers and experience is fascinating and quite inspirational!
I’ve noticed one thing about spinning lists in particular (although all fiber lists show this tendency): newcomers all have basically the same questions and they all revolve around ‘rules.’ Most newbie questions boil down to “What am I supposed to do to get this result?” The long-time spinners on the list all pitch in and try to give them alternatives and options. But the advice is frequently conflicting and ambiguous. Why is it that way? Why can’t you simply give one clear set of directions and make it work every time?
Well, it has to do with the nature of spinning. Spinners aren’t machines, and if you put 100 spinners in a room, furnish them with identical wheels and fiber and tools, and ask them to spin a semi-worsted yarn of 10 wpi, you’ll get 100 slightly different yarns. If you watch how they go about producing that yarn, you’ll also see 100 slightly different techniques of fiber preparation, wheel setup, and spinning technique. I saw this in microcosm a few years back when a group of us did a sheep to shawl. I was the weaver for the six to eight spinners. Combining yarn from each spinner while maintaining a balanced plain-weave fabric was a challenge, even though each spinner was pretty good at spinning to the specified grist!
It’s like doing a presentation or a webpage. Some people like PowerPoint, some like Publisher, some Excel; while others prefer Corel or Photoshop or FrontPage. Any of those programs can get the job done, but different programs are better suited to different types of information. Additionally, some of us are more comfortable with one program than with another. Spinning is similar – there are many ways to get to the same end result, and each spinner chooses the technique best-suited to him/her as an individual.
I’ve talked about the variables in spinning before, but let’s re-visit them. Spinners are all different – different body types, different physical requirements and limitations and advantages. Wheels are also different, and some wheels are simply better suited to certain types of spinning (or spinners). You can adjust and finagle to make them spin other yarns, but it simply isn’t easy to spin gossamer-weight cotton on a wheel that’s designed for producing bulky, low-twist wool yarns. Individual animals are different – one fleece may be very different from another, and quality and fineness can vary from year to year on the same animal. As for plant fibers, different growing locales and conditions also give very different fibers. Try river-bottom flax and then mountain-grown flax – very different grist of individual fibers and very different color in the raw fiber gives a very different yarn to the same spinner with the same prep! Tools other than wheels are different, too – some are mechanized, and thus give a more consistent preparation; but hand tools will give widely variable results depending on the experience and technique of the user.
I can hear you now – “Are you saying there are NO rules?!?!” Well, yes and no. You shouldn’t try to spin long-wearing rug yarn from merino might be a rule. You shouldn’t spin a lacy camisole from Churro might be another. However, IF you look hard enough, there might be an individual Churro which would make a lovely camisole, and an individual merino whose fleece for that year would make great rug yarn. It isn’t likely, but it is possible; which would change the above statements from rules to suggestions.
Spinning is as much an art as a craft. Ask a potter how to get a specific shape and you’ll get several alternatives. Spinning is the same. There is always more than one way to get a given result. While this seeming abundance of alternatives might seem overwhelming to a beginner, get the basics down, shift your focus just a little and it becomes creative and freeing.
What are the basics? Spinning is very simple – get twist into fibers in order to make them hold together. There are no ‘rules’ about how to do that, and any number of techniques can be used to get the same end result – fibers that are held together by friction and compression. Think about all the types of yarn – worsted, smooth multi-ply yarns begging to be used in patterns of cables or lace; fuzzy, thick and thin single-ply yarns demanding to be an accent in sweater or purse; and everything in between. Can you think of different ways to get those yarns? No? Sure you can! How about one very basic difference? You can use either a spindle or a wheel to get exactly the same yarn. No way? Yes, way! It’s easy, it’s fun, and you can try it with any fiber.
Spindles and wheels (and carders and combs and hands) are tools. The only limitation to any tool is the skill of the tool-user – the spinner. I do combination spinning all the time – part of the fiber on the spindle that travels with me everywhere, and part on the wheel at home. I can match almost any yarn spun on one with the other. But there are a couple of limitations for me at this point in my spinning career – for really gossamer-fine spinning of down fibers like cashmere I prefer a supported spindle. I have trouble matching that fineness and delicacy consistently with down fibers on my wheels. But I DO normally use a wheel to ply those spindle-spun singles, both because I can get more on a bobbin than I can on a spindle and because it’s easier for me to control the amount of plying twist on the wheel.
On the other hand, I’ll normally use the wheel to make softly-spun bulky singles. I don’t like heavy spindles, and own only one for a simple reason – using them for more than a few minutes hurts. But I can stop and start my double-treadle wheels easily using a large whorl and slow treadling speed to make a fairly consistent bulky single. It works for me, so I do it this way. But these techniques may not suit you! Your favorite tool for spinning soft-twist, bulky singles might be a Navaho spindle. If so, use it! If the yarn is what you want, you’re spinning it ‘properly.’ Can you refine your techniques and procedures to get the same result more easily? Perhaps. That’s another reason to keep reading and studying and sampling. Another spinner’s method may spark an idea in you!
Spinners will tell you that different fibers require different spinning techniques. You don’t spin cotton in the same way as wool, or wool in the same way as silk. Does that mean you can only spin silk, for example, one way? Nope. You can use silk roving, caps or hankies to spin anything from bulky singles to hair-fine thread with any amount of twist you choose as long as the end result hangs together. You can use any wheel or spindle at any ratio or weight in order to do so. But you WILL have to modify your technique with each tool in order to obtain your desired result.
Can you spin cotton thread on a Country Craftsman? Yes, but it will take longer and require more adjustments on the part of the spinner than spinning the same cotton on a charka. So if you have a charka, why not use it? If you don’t own a charka, go ahead and tinker!
Are there limitations? Only those imposed by the laws of physics and the spinner’s own body. For example, the spinner on that Country Craftsman should be prepared to treadle 5 or 6 times for each inch of cotton thread (at a 3:1 ratio, 5 to 6 treadles would put a reasonable 15-18 twists per inch into the cotton). If she/he doesn’t, the resulting cotton thread won’t hang together because there won’t be enough twist inserted to generate sufficient friction and compression to keep the fibers together. That’s a limitation that the spinner might want to address by choosing to use a different tool. Of course, if part of the idea is to incorporate gentle aerobic exercise into spinning time, this might be a good method!
“So you’re saying that there really aren’t any rules at all?” Well, yes, pretty much. That’s one reason why I said there was an artistic component involved in spinning. There are techniques, suggestions and guidelines, some of which I’ve touched on above (or before) but there is only one hard and fast rule – it isn’t spinning if there’s no twist! If you have incorporated twist into a fiber, it’s spun. That has another ‘twist’ to it (pun more or less intended) – if you like the yarn you’re spinning, you’re spinning just fine! Tell the self-appointed spinning police to go pester somebody else.
Instead of looking at the lack of ‘rules’ in spinning as frightening and bewildering, shift your focus a little. Spinning is a craft, yes, and it does have one rule. But it’s also an art, and in art there are few hard and fast rules – only alternatives and possibilities to explore! So use the tools and techniques you find comfortable. Time and practice will almost certainly present you with alternative tools and techniques, and don't be hesitant about trying them; one of the best things about spinning is its simplicity and the way in which that simplicity encourages individual experimentation and expression.
I’ve noticed one thing about spinning lists in particular (although all fiber lists show this tendency): newcomers all have basically the same questions and they all revolve around ‘rules.’ Most newbie questions boil down to “What am I supposed to do to get this result?” The long-time spinners on the list all pitch in and try to give them alternatives and options. But the advice is frequently conflicting and ambiguous. Why is it that way? Why can’t you simply give one clear set of directions and make it work every time?
Well, it has to do with the nature of spinning. Spinners aren’t machines, and if you put 100 spinners in a room, furnish them with identical wheels and fiber and tools, and ask them to spin a semi-worsted yarn of 10 wpi, you’ll get 100 slightly different yarns. If you watch how they go about producing that yarn, you’ll also see 100 slightly different techniques of fiber preparation, wheel setup, and spinning technique. I saw this in microcosm a few years back when a group of us did a sheep to shawl. I was the weaver for the six to eight spinners. Combining yarn from each spinner while maintaining a balanced plain-weave fabric was a challenge, even though each spinner was pretty good at spinning to the specified grist!
It’s like doing a presentation or a webpage. Some people like PowerPoint, some like Publisher, some Excel; while others prefer Corel or Photoshop or FrontPage. Any of those programs can get the job done, but different programs are better suited to different types of information. Additionally, some of us are more comfortable with one program than with another. Spinning is similar – there are many ways to get to the same end result, and each spinner chooses the technique best-suited to him/her as an individual.
I’ve talked about the variables in spinning before, but let’s re-visit them. Spinners are all different – different body types, different physical requirements and limitations and advantages. Wheels are also different, and some wheels are simply better suited to certain types of spinning (or spinners). You can adjust and finagle to make them spin other yarns, but it simply isn’t easy to spin gossamer-weight cotton on a wheel that’s designed for producing bulky, low-twist wool yarns. Individual animals are different – one fleece may be very different from another, and quality and fineness can vary from year to year on the same animal. As for plant fibers, different growing locales and conditions also give very different fibers. Try river-bottom flax and then mountain-grown flax – very different grist of individual fibers and very different color in the raw fiber gives a very different yarn to the same spinner with the same prep! Tools other than wheels are different, too – some are mechanized, and thus give a more consistent preparation; but hand tools will give widely variable results depending on the experience and technique of the user.
I can hear you now – “Are you saying there are NO rules?!?!” Well, yes and no. You shouldn’t try to spin long-wearing rug yarn from merino might be a rule. You shouldn’t spin a lacy camisole from Churro might be another. However, IF you look hard enough, there might be an individual Churro which would make a lovely camisole, and an individual merino whose fleece for that year would make great rug yarn. It isn’t likely, but it is possible; which would change the above statements from rules to suggestions.
Spinning is as much an art as a craft. Ask a potter how to get a specific shape and you’ll get several alternatives. Spinning is the same. There is always more than one way to get a given result. While this seeming abundance of alternatives might seem overwhelming to a beginner, get the basics down, shift your focus just a little and it becomes creative and freeing.
What are the basics? Spinning is very simple – get twist into fibers in order to make them hold together. There are no ‘rules’ about how to do that, and any number of techniques can be used to get the same end result – fibers that are held together by friction and compression. Think about all the types of yarn – worsted, smooth multi-ply yarns begging to be used in patterns of cables or lace; fuzzy, thick and thin single-ply yarns demanding to be an accent in sweater or purse; and everything in between. Can you think of different ways to get those yarns? No? Sure you can! How about one very basic difference? You can use either a spindle or a wheel to get exactly the same yarn. No way? Yes, way! It’s easy, it’s fun, and you can try it with any fiber.
Spindles and wheels (and carders and combs and hands) are tools. The only limitation to any tool is the skill of the tool-user – the spinner. I do combination spinning all the time – part of the fiber on the spindle that travels with me everywhere, and part on the wheel at home. I can match almost any yarn spun on one with the other. But there are a couple of limitations for me at this point in my spinning career – for really gossamer-fine spinning of down fibers like cashmere I prefer a supported spindle. I have trouble matching that fineness and delicacy consistently with down fibers on my wheels. But I DO normally use a wheel to ply those spindle-spun singles, both because I can get more on a bobbin than I can on a spindle and because it’s easier for me to control the amount of plying twist on the wheel.
On the other hand, I’ll normally use the wheel to make softly-spun bulky singles. I don’t like heavy spindles, and own only one for a simple reason – using them for more than a few minutes hurts. But I can stop and start my double-treadle wheels easily using a large whorl and slow treadling speed to make a fairly consistent bulky single. It works for me, so I do it this way. But these techniques may not suit you! Your favorite tool for spinning soft-twist, bulky singles might be a Navaho spindle. If so, use it! If the yarn is what you want, you’re spinning it ‘properly.’ Can you refine your techniques and procedures to get the same result more easily? Perhaps. That’s another reason to keep reading and studying and sampling. Another spinner’s method may spark an idea in you!
Spinners will tell you that different fibers require different spinning techniques. You don’t spin cotton in the same way as wool, or wool in the same way as silk. Does that mean you can only spin silk, for example, one way? Nope. You can use silk roving, caps or hankies to spin anything from bulky singles to hair-fine thread with any amount of twist you choose as long as the end result hangs together. You can use any wheel or spindle at any ratio or weight in order to do so. But you WILL have to modify your technique with each tool in order to obtain your desired result.
Can you spin cotton thread on a Country Craftsman? Yes, but it will take longer and require more adjustments on the part of the spinner than spinning the same cotton on a charka. So if you have a charka, why not use it? If you don’t own a charka, go ahead and tinker!
Are there limitations? Only those imposed by the laws of physics and the spinner’s own body. For example, the spinner on that Country Craftsman should be prepared to treadle 5 or 6 times for each inch of cotton thread (at a 3:1 ratio, 5 to 6 treadles would put a reasonable 15-18 twists per inch into the cotton). If she/he doesn’t, the resulting cotton thread won’t hang together because there won’t be enough twist inserted to generate sufficient friction and compression to keep the fibers together. That’s a limitation that the spinner might want to address by choosing to use a different tool. Of course, if part of the idea is to incorporate gentle aerobic exercise into spinning time, this might be a good method!
“So you’re saying that there really aren’t any rules at all?” Well, yes, pretty much. That’s one reason why I said there was an artistic component involved in spinning. There are techniques, suggestions and guidelines, some of which I’ve touched on above (or before) but there is only one hard and fast rule – it isn’t spinning if there’s no twist! If you have incorporated twist into a fiber, it’s spun. That has another ‘twist’ to it (pun more or less intended) – if you like the yarn you’re spinning, you’re spinning just fine! Tell the self-appointed spinning police to go pester somebody else.
Instead of looking at the lack of ‘rules’ in spinning as frightening and bewildering, shift your focus a little. Spinning is a craft, yes, and it does have one rule. But it’s also an art, and in art there are few hard and fast rules – only alternatives and possibilities to explore! So use the tools and techniques you find comfortable. Time and practice will almost certainly present you with alternative tools and techniques, and don't be hesitant about trying them; one of the best things about spinning is its simplicity and the way in which that simplicity encourages individual experimentation and expression.
Subscribe to:
Posts (Atom)