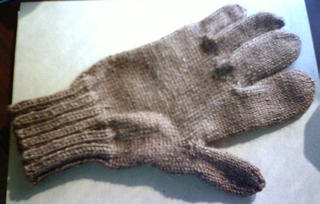
My DH is a large man. He’s big-boned and broad-shouldered – nice to snuggle up to on a cold winter’s night. But knitting for him sometimes makes me feel as though I’d started on an endless project – it takes so MANY knit stitches to fit him! So I tend to do small things for him – mittens, hats, scarves and such. Lately he’s been hinting for a pair of gloves. I found some lovely KnitPicks Andean Silk in chocolate brown worsted weight (96 yards per 50 grams) and fell in love with the look of the yarn. So I ordered enough for a pair of gloves, and decided that they would make a lovely addition to his Christmas. You can see a picture of the first one below (and in the August 24 entry), and I finished up the second one this weekend.
Knitting with this yarn was a real pleasure – it flows through the fingers like silk, but with all the softness of fine alpaca and wool. The finished fabric is beautiful, with good stitch definition and just enough bloom to make the gloves lovely and warm.
But back to the beginning of this project! It had been about a year since I did my last pair of gloves, so I started looking for a pattern on the web, and found nothing for an extra-large men’s glove for worsted-weight yarn. So I pulled out my old magazines and found the glove issue (Winter 2003) of Knitters from Interweave Press. Yes! Exactly what I wanted – guidelines for making gloves that would fit him exactly!
You know, as a beginning knitter, socks didn’t scare me. I completed my first three pairs before I realized that turning a heel was supposed to be difficult. Gloves frightened me, though. How on earth could you pick up all those stitches for fingers and knit them to just the right length? What if you picked up too many or too few stitches – could you take them back out? It just looked too complicated!
Well, time went on. I knitted hats, mittens, baby sweaters, and i-cord. Small tubes didn’t make me nervous anymore. Then I saw that issue of Knitters and a light-bulb went off in my head. I could do this! And I did, making gloves for myself during Winter 2003 and more pairs for Christmas 2004 gifts. I’ve even gotten bold, making color-patterned gloves and learning all about how gauges shift when yarn is carried. But for some reason these simple gloves for my DH made me nervous. Perhaps because I really wanted them to fit him perfectly – after all, he’s my chief fiber enabler. So I’ll offer these guidelines for others who want to make gloves that fit exactly!
1. Swatch! And wash your swatch! Measure it both before and after washing! I know this is elementary, but it’s an absolute if any wearable is going to fit properly. This particular yarn was designed to be used for sweaters and hats and such. The recommended gauge on the yarn sleeve is 4.5 – 5 stitches per inch on size 7 or 8 US needles. Unfortunately, this doesn’t suit at all for gloves. The fabric is too loose, and allows too much wind and cold through. If you felt the gloves enough to keep the wind out, they’re too stiff for comfort. So you have to swatch in order to find a fabric that will keep the cold out, but still move easily with the myriad hand movements we make, even outdoors in winter cold. I started out with size 5 needles, but that fabric (at 5.25 stitches per inch) was still too loose. I moved down to size 4 needles, and that was better (5.5 stitches per inch), but still not quite what I wanted. So I finally went to size 3 (3.25mm) Brittany wooden double-point needles. That was exactly what I needed – a fabric of 6 stitches and 8 rows per inch which was nice and dense, but still with plenty of give. And knit at this gauge there was a slight bloom upon washing, but no real shrinkage or felting.
I always work on 5 double-point needles. I find that a less acute angle between needles, and thus stitches, makes for less laddering problems. But if you prefer 4 double point needles, or even one or two circular needles, go for it. A word to those who like doing small circumferences on a large circular, though – I’ve never been able to get it to work well on the fingers. The circumferences are just too small.
2. Take accurate measurements! A surprise isn’t really a pleasure for either the recipient or the maker if it has to be re-done before it can be worn. If you can manage to take your measurements surreptitiously, great. But if the only way to get good measurements is to sit down with the intended wearer and a tape measure, by all means do it. My DH got a great deal of pleasure from watching me work on his gloves, bragging to everyone that these were for him, made exactly to measure!
The easiest thing to do if you won't have ready access to the person for whom you're knitting is to simply trace around their hand on a piece of paper. Measure the hand width and double that number (front and back of hand) at each of the points listed in the paragraph below. Add an inch's worth of stitches at your gauge (6 stitches per inch in this case) to allow for the thickness of the hand. And you have it. You might want to check to be sure their hand isn't unusually thick - if so you can add a few extra stitches to make up for it. (Thanks to Fran for this editorial note.)
The minimum measurements for gloves are: wrist circumference, knuckles circumference, gusset circumference (around hand at base of thumb, at the widest point of a fist), hand length from base of wrist to tip of longest finger, and ribbing length desired. Write these down – believe me, you won’t remember a week later and these sizes need to be exact!
3. Ask or look to see how the wearer wants the gloves to fit. Gloves are like socks – some people like a little room, others like them to fit tightly. I make gloves for myself with a slightly negative ease, but my DH prefers a bit of room.
4. Do the math! Your gauge swatch will give you not only stitches but rows per inch. You’ll need that later, so write it down. Your written instructions don’t need to be elaborate, but they do need to be legible – you have that second glove to make, after all! Figure out exactly how many stitches you need to cast on for the wrist and then decide on the ribbing you’ll use. I was lucky – DH’s wrist circumference was just a hair over 8.5 inches, giving a cast on (at 6 stitches per inch) of 51 stitches. So I cast on 52 stitches for a couple of reasons. First, I wanted a long ribbing of 3 inches so that the gloves would slide well under his coat sleeve band, and his wrist expands into a larger arm measurement within those 3 inches. Second, he likes his gloves to fit loosely. A 52-stitch cast-on would take care of both of those, and also be divisible by 4, which would allow my preferred K2P2 ribbing.
5. Check the difference between the knuckle and wrist circumference. Some people have less than an inch difference between these measurements, but some people have considerably more. If the difference is less than an inch, I don’t bother with increases. But if it’s an inch or more, I plan increases in the first row after the ribbing. My DH’s is exactly an inch, so I planned for 5 increases in the first row after the ribbing. This makes the glove hand exactly the diameter of his hand (9.5 inches at 6 stitches per inch equals 57). By the time allowance is made for the width of the fabric itself, this gives a fit exactly the way he likes it – slightly loose. I would subtract ¼ - ½ inch from the actual measurement to get the tight fit I prefer for myself, and with only ¾ inch difference between the two measurements normally don’t do any increases unless I’ve chosen a rather inelastic fiber like cotton.
6. Start your gusset increases about an inch from the point where the ribbing ended (on the 9th row for my DH’s gloves). This is the first place your row gauge will come in handy. I like an asymmetric thumb gusset, so that’s what I’ll use in these instructions. If you prefer another gusset style, by all means use it. I divide my stitches into fourths fairly automatically, making adjustments as needed so that the center of the round falls between the end of the second and beginning of the third needle. This makes starting a gusset easy – for the left hand the drill is knit to 2 stitches from the end of the second needle, place a marker, increase 1 stitch, knit 4, place another marker, and continue. On the next round, knit even. Continue, alternating an increase round with a plain one, until you have enough gusset stitches.
What’s enough? How much difference is there between your knuckle measurement and your gusset circumference measurement? In the case of my DH, there’s 1.75 inches. So I increased every other round until I had 12 stitches between the markers. 12 stitches is 2 inches at your 6 stitch per inch gauge. 12 minus the 8 stitches you increased is 4 stitches, or 3/4 inch. Yes, this will make the gusset have a slight negative ease – ¼ inch – but you’ll make up for that when you pick up the palm stitches to knit your thumb. I’ll grant that I just did this and hoped it would work out, since the gusset, at 12 stitches, was exactly the right length (judged by trying it on my DH). But then I looked back at various patterns and found that it was fairly common to have a slight negative ease at this point.
On the next round I transferred the gusset stitches to a double strand of worsted-weight yarn, threading it though a yarn needle and slipping the stitches purl wise onto the yarn. I then did a backward-e cast on of the original 4 stitches (those between the markers, remember?), taking me back to my original 57 hand stitches. On the next round I put two of those cast-on stitches on the 3rd needle, and left two on the second needle. Do cast these stitches on snugly, but don’t obsess too much about slightly loose stitches here – you can tighten them up when you knit the thumb.
7. Now it’s time to look at your row gauge again. How much room do you need from the end of the gusset, which should fall at the bend of the thumb, to the point where you’ll start the fingers? It’s different for everyone, but the average is between 1 and 2 inches. If the recipient is handy, they can try it on; but if not, you’ll have to make a choice. My own smaller hand only needs an inch plus one row; my DH needed almost 2 inches (18 rows). Knit those rounds even, and stop on the final round at the end of the second needle – just above the mid-point of the thumb gusset, with two of the stitches you cast back on at the front of the hand, and the other two at the back.
You’re about to figure your fingers, so put down the knitting and grab a pencil and the calculator. Do all your figuring first – then knit! And don’t worry if the amounts of stitches seem a little scanty – you’re going to be adding stitches between the fingers.
Your first finger will be done on 1/3 of the total number of stitches. In the gloves I made for my DH, 57 divided by 3 is 19. The middle finger will be done on ¼ of the total number of stitches – in this case that will be 15 stitches. The ring finger and little finger will divide the remaining stitches. 57 minus 19 minus 15 equals 23. That won’t divide evenly in half, so I used 12 stitches for the ring finger and 11 for the little finger.
Next decision: How much room do you need between fingers? The usual rule of thumb is ¼ to ½ inch’s worth of stitches, but not more than 4. On gloves for myself at a gauge of 6 stitches per inch, I’d cast on 2 stitches for the fourchette (between fingers) stitches, but my DH is quite a bit larger than I am. I’ll use three stitches for him.
8. Now you’re ready to knit the fingers. First transfer ALL the hand stitches (yes, all of them) to a doubled strand of yarn of a different color than that you’re working with. It makes seeing what you’re doing much easier. Now use one double point to pick up 9 stitches from the palm (orient yourself by the thumb opening) and 10 from the back-of-hand stitches. There’s your 19 stitches. Your thread will already be at the midpoint if you divided your stitches as I suggested above. Knit around to the space between the first and middle fingers; add 3 fourchette stitches using the backward-e cast-on technique onto a third needle. Continue knitting around. After another row or two, redistribute your stitches on the needles so that you have some support for that fourchette. I tend to work these small tubes on either four or five double-point needles, whichever is more comfortable at that time. Keep knitting the tube around and around until the length is even with the end of the finger. Next row, knit 2 stitches together around, reducing the number of stitches by half, and then do another knit 2 together round. You’ll end up with no more than 5-6 stitches. Cut a long yarn tail, run it through the stitches twice, then draw together tightly. Take the end to the wrong side and weave it in.
9. For the middle finger, you’ll use 8 stitches from the palm side and 7 from the back-of-hand side, just to keep things even. Pick these up on two double point needles. Take a third needle and pick up the 3 fourchette stitches from the first finger. If necessary, pick up an extra stitch at each corner and decrease it away by knitting two together on the next round – that will help eliminate any holes. Attach your thread at the ring-finger end of the back-of-palm stitches and knit that needle, then the fourchette pick-ups and the palm stitches. Now do a backward-e cast-on of three more fourchette stitches to take care of the space between the middle and ring fingers. Knit a round, decreasing any extra stitches, then redistribute the stitches more comfortably. Again, continue knitting until just at the end of the finger, and fasten off in the same manner as for the first finger.
You’ll have an extra end where you started this finger. Use that to help eliminate any holes, too. Instead of just weaving it in for a half-inch and cutting it off, take it around in duplicate stitch and use it to double the thickness of the yarns around those holes. That should take care of any holes easily.
10. Do the ring finger much the same as the middle one; pick up 6 stitches each from the palm and back-of-hand, the 3 fourchette stitches between this and the middle finger, and add 2 or 3 stitches between the ring and little fingers. By this time it’s probably quite comfortable, and you’re anticipating what you should do. Again, pick up an extra stitch in the corners if needed, and decrease them away on the first round. Knit round and round to the desired length, and do the decreases and finishing as for the first and middle fingers.
11. You’re down to the little finger. Pick up the remaining 11 stitches on two needles, pick up the fourchette stitches from the ring finger, and knit around to the end of the finger. Decrease as for the other fingers, and weave in all ends.
12. Now for the final effort. Go back to the thumb. Of course you can do this at any point after the gusset stitches are completed, but I usually do it last of all. To many knitters, the thumb can be tricky. You’ll first slide the live stitches on your yarn (12 of them, remember?) back onto two or three double point needles. Now pick up at least the 4 stitches you cast onto the palm on another double point needle. I normally pick up two extra stitches, one at each end, to help eliminate holes and provide a bit of extra ease. So I picked up a total of 18 stitches. Attach your yarn, beginning to knit at the palm side of the stitches. Continue to knit around, just as for the fingers, until you’re at the end of the thumb. Knit 2 together around, then knit 2 together around again. You’ll have 4 or 5 stitches to finish off just as you did the fingers.
13. If you haven’t already, weave in all your ends, including the cast-on back at the ribbing. Make the right glove just as you did the first one, EXCEPT: when you start the thumb gusset, change your point of increase. On that 9th round, knit to 2 stitches from the end of the second needle, place your marker, knit 4 stitches, increase 1 stitch, then place the second marker. Just shift your increases to the other end of the markers! Proceed just as you did for the left glove, doing a plain round between the increase rounds until you have the required number of gusset stitches. That will make left and right handed gloves, with all the increases on the palm side. Continue exactly as for the left glove.
Now wash the gloves, finger-block carefully, and let dry. Then box nicely, and don’t forget to include both fiber content AND washing instructions!
These make beautiful small gifts for Christmas or birthdays, and the amounts of yarn needed are so small that you can afford to use those beautiful cashmere yarns you lust after at your LYS. 100 grams will do anything up to an adult large glove. (However, I used about 120 grams for my DH’s extra-large gloves.) They work up amazingly fast, with a pair of simple gloves taking no more than a week of evening knitting. They’re astounding to the recipient, who doesn’t have a clue how simple they are to make. And like socks they’re easy to ‘dress up’ with fancy stitches or color work bands. How about duplicate-stitching initials into the palm stitches just above the ribbing band? Or even eliminating ribbing entirely and doing color work rounds in place of the ribbing? You can use them as the swatch for a Fair Isle sweater and have a matching pair of gloves for your cardigan!
Like socks, the techniques for gloves are easily memorized, and they’re great carry-along knitting, as well as being great summer knitting. Working on them in public is a sure-fire conversation starter, too, since so many people can’t believe what their eyes are showing them (especially if you’re working on the last couple of fingers). “Are you really making gloves?” is the usual comment, delivered in an amazed tone. My usual reply is a rather smug “Absolutely.” The conversation always continues from that point, and I’ve ‘hooked’ several fiber addicts through knitting gloves in public.
So gather some beautiful wool or wool-blend yarn to match your favorite winter coat and a tape measure. I’ve synthesized and meshed several things together from not only the three articles in that Winter 2003 copy of Knitters, but my own experiences for the steps outlined. Follow the steps above, or pull out your own copy and follow the steps in the articles given. Make your first pair. But beware – gloves are almost as addictive as socks! Don’t say I didn’t warn you!
Monday, August 29, 2005
Wednesday, August 24, 2005
What a Great Weekend!
We went to Chicago to see my son’s Pass in Review (graduation from Navy recruit training, for the non-Navy folks out there). We had a great time! We left Tennessee on Wednesday evening, drove up to between Louisville and Indianapolis, and then on Thursday drove on to Chicago.
The Great Lakes Naval Training Facility is to the north of Chicago, in North Chicago. Lovely country, with the lake to the east and the plains stretching out to the west. Friday was the graduation, and I must say that the Navy does ceremony well. It was both moving and impressive. I suppose if you do something every week for decades you eventually do learn what works and what doesn’t!
Got my hands on my seaman as quickly as possible, and left for as much family time as we were permitted. He had liberty on Friday afternoon and early evening, Saturday all day until early evening, and Sunday. We consulted, and he wanted to go to Six Flags and ride roller coasters! This was a bit of a surprise, but we were amenable. Roller coasters are always fun! So we spent several hours of a very hot (over 90 degrees) summer afternoon riding up, down and around at fairly high speeds. Then it was back to the hotel to cool off and have a home-cooked meal and then back to the base to drop off the boy. The hotel bed definitely looked good that night!
Saturday was downtown Chicago. My younger son wanted to see the view from the Skydeck of the Sears Tower and all of us wanted to see the Art Institute. We started from the Lake Forest train station and spent a pleasant hour conversing, sightseeing and knitting enroute to Olgivie Station. Then it was off walking from the station to the Sears Tower and back to the Art Institute. More walking through the Institute, along with a slight disappointment – the textile collection was closed for construction! Only a slight disappointment, though, since the Toulouse Lautrec exhibit was open, and the European collection from the 1400’s through the 1800’s was open. By the time I’d perused both of those I felt like I needed a rest! I told my DH that I really wanted about 2 months of daily visits to the Art Institute and asked him to please arrange it. He laughed, and promised that if we ever came into a lot of money he’d do what he could.
Sunday was the day we had to leave to come home. Younger son had to be back at school on Monday, and older son’s girlfriend (also along for the weekend, and a really nice young lady) ditto. So we picked up our seaman as early as possible and went to breakfast – a late breakfast for us, and a second one for him. After eating we drove east to Lake Michigan and paddled our feet in the very cold water for a few minutes. Then it was back to the base for the last time, with tears and laughter and promises to try to get home for the holidays and to write often.
I’m so proud of all my children; they’re growing up to be good and responsible people. I do realize that this is only the first leave-taking – my son-in-law is already in the Army, and my daughter is headed into officer’s training as soon as she graduates from college in January – but placing a child into the hands of an impersonal military is so difficult. Time to stop this train of thought, or I’ll start crying again!
Knitting is a great ice-breaker on a crowded train! I was working on this glove’s fingers while riding to and from town on Saturday, and had so many people ask me about what I was making.
One lovely knitter in the Lake Forest station with a Russian accent and limited command of English communicated quite well that she loved the yarn (KnitPicks worsted-weight Andean Silk alpaca-silk-wool in a chocolate color) and thought that I was doing a very good job of knitting. Also that my DH was a lucky man to have a wife who would make him such warm gloves for winter! The train was also packed with Navy personnel and their families, and many of the seamen and officers commented on the knitting – one even hinted to his wife that he would like a pair like the ones I was making.
We’re back home now, and getting back into the daily routine. Work is busy, of course; you always pay for time off by having to catch up on everything you missed. It seems harder than usual, but that’s probably due to the cold I picked up somewhere on the trip. In any case I have lovely memories of a weekend of family fun to sustain me until I get to see my seaman again!
Wednesday, August 10, 2005
Safety and Handwork
Yes, a question has set me off again! But in a different vein from my usual rant. There has been quite a bit written about knitting and spinning and crochet and various repetitive stress disorders, and I don’t want to revisit that topic. But very little has been written about basic tool safety. Perhaps we just don’t think of our fiber tools as dangerous objects. The facts, however, say differently; safety should be addressed. Fiber tools are frequently sharp and/or pointed very hard objects.
I spend five days a week in an extremely safety-conscious workplace. So I’ve learned to be quite aware of safety in everything I do. As knitters and spinners we use potentially dangerous tools many times a day; so often that we cease to think of them as dangerous. But any safety engineer will tell you that it isn’t extraordinary circumstances that get people hurt – it’s the little repetitive everyday chores. So let’s take a look at our tools from a safety viewpoint, first spinning, then knitting.
First there are scissors. Remember your mother warning, “Don’t run with scissors in your hand!” There is a reason. Depending on what I’m doing, I may use either blunt- or sharp-pointed scissors with blades ranging from little more than an inch long to comparatively huge 9-inch dressmakers’ shears. The sharp points all have sleeves. Most of those sleeves are made from heavy vinyl or leather that has been cut to shape for each pair of scissors and closely stitched to prevent the points from working their way out. A few have hard plastic sleeves, but these tend to get lost – therefore they don’t do any good. The blunt points are stored with the blades closed. Think about your scissors. If you sit on them, or drop them onto your foot, could it mean a nasty puncture wound? Then secure them in a sleeve or case. The time lost in removing and replacing them is minimal.
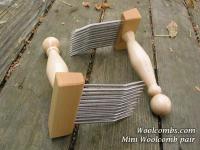
I’m a spinner of primarily worsted yarns. So I have wool combs in two sizes. If you’ve never seen wool combs, you’ll be shocked by a description. Pictures of my particular combs are from
Bountiful
and from Woolcombs.com.
As you can see, these are as dangerous as any set of chef’s knives. Tines range from the 3.5 inches of the mini-combs to the 6-plus inches of the Indigo Hound Viking combs. Each comb has two rows of these lethal steel spikes. I’ve been known to intimidate my daughter’s dates with these tools. How on earth can you use them safely?
First, break down what steps it will take to get the job done. In this case, you want to end up with clean, fluffy, well-aligned top, nested and ready to spin into fabulous worsted yarn. So the first step is to clean the well-skirted wool. Use a good detergent, plenty of really hot water, and several rinses – you don’t want sticky fleece! While the fleece is drying, shake it around a bit to get out as much vegetation as possible – sheep are messy eaters.
Then set up a work station. You’ll want plenty of elbow room on a steady table or workbench and a stool that’s a good height for working. Leave room so that you can get around all sides of the work table. Put a trash can on one side of the stool, and a basket for your roving nests on the other. Leave room for a pile of fleece – I put mine to the right side of the metal carriage bolt I use for clamping the stationary comb. My chosen diz is placed to the left. That bolt is fastened securely with a nut and wing-nut arrangement into a hole drilled in my workbench. I can take it loose fairly easily, but once fastened in place, it stays put. I use a second nut to fasten down the stationary comb securely. You don’t want those steel spikes sliding around!
The workbench itself is a fairly heavy, height-adjustable steel bench with a footprint of 36 x 24 inches and an inch-thick fiberboard top bolted to the steel frame. A pierced metal shelf about 18 inches below the top holds tools and provides additional stability. Rubber feet protect the wood floor in my studio from scratches and keep the bench from moving around. As I recall, this bench cost me about $25 at a local home supply warehouse. A bar stool with a short back provides the needed height for comfortable work seating.
Pile up the fleece in your designated tabletop space. Don’t try to do more than a few ounces at a time; store the remainder in a bag or box until you’re ready to comb it. Remove one comb from the holder (most combs come with a holder – if yours didn’t, make one in a similar fashion to the scissor holders described above. Use heavy upholstery fabric or leather.) Walk around the table and carefully fasten down the stationary comb from the back – don’t try to work over the tines! Make sure the comb is secure before you move on to the next step.
Seat yourself and check the position of the trash can and basket. They need to be within easy reach. Turn off the ringer on the telephone and make sure anyone else in the house is both well-occupied and aware that you shouldn’t be disturbed for anything less than arterial blood flow. This is probably a good time to mention that you should have another driving adult within calling distance – accidents do sometimes happen, and a big component of safety is preparedness. If you’re alone, fasten a cell phone or cordless phone to your body (I put mine at the small of my back).
Now let’s review this setup. Your stationary comb is securely fastened to your work surface. Your traveling comb is still in the holder. A trash can is on one side of your stool, a basket for the combed top is on the other. The fleece is on the right of the stationary comb, the diz on the left. A phone or person is handy, but not in the way. You’re ready to go!
Begin to lash on locks of fleece. This is one of the most dangerous parts of the process. I pick up a lock or a handful of clean fleece and ‘comb’ it onto the stationary comb, holding the lock at the end opposite the one I’m lashing onto the comb. This lets me avoid placing my hand or wrist over the top of the spikes. Never load the combs more than half-full, and I normally stop loading when the tines are about one-third covered. This normally yields a 7-10 gram (about 1/4 ounce) strip of top; plenty to deal with at one time.
Now carefully remove the traveling comb from its holder and begin combing the lashed locks from the stationary comb. Work the traveling comb from left to right and right to left in front of your body. Avoid combing down toward your knees or up toward your face! Keep movements easy, but controlled. When most of the fleece has transferred, it’s time to clean off the stationary comb. Carefully place the traveling comb, tines to the side, on a clear space next to your diz. Then, working from the front, lift the short and trashy remainders from the stationary comb and put them into the trash can. Check the stationary comb to be sure it hasn’t loosened.
Pick up the traveling comb and begin combing the fleece back onto the stationary comb. Keep the traveling comb tines pointing to the side, as before. When the fleece has been transferred back to the stationary comb, lay the traveling comb down with the tines still pointing to the side and carefully push off any short, trashy bits onto the work surface; move the comb and brush the bits into the trash. Shift the traveling comb to a point-down orientation on the table or a pad and evaluate the locks on the stationary comb. Are they sufficiently combed? If not, repeat the process. When everything is combed and clean, it’s time to pull the top from the stationary comb.
Carefully slip the traveling comb back into the holder and put it back onto its shelf. Pick up the diz and tease a bit of the fluffy mass from the stationary comb through the hole. Working carefully from the front of the comb, pull off your top, allowing it to fall into the basket to the side of your chair. Once you have all the top pulled off, there will be some residue remaining on the comb. Working from the bottom, push this up the comb and onto the work surface. Then brush it into the trash.
Continue in this manner until you’ve combed for a half-hour. You’ll have at least 4-6 ounces of top at this point, and that’s a good stopping place. If you work for much longer than that, your hands will tire and your concentration will begin to wander – it’s no longer safe to continue. Unfasten your stationary comb and put it away. Even if you’re absolutely sure you’ll be coming back in an hour or so to continue combing, put that lethal tool away. You could stumble, somebody could come to the door and wander into the workroom, your beloved cat (or child) could jump onto the table. Take the time to walk back behind the table, unfasten the nuts, remove the comb and replace it in the holder.
Now what about the handheld combs? You aren’t always at your home work space; there are public demonstrations, and times when you just need or want to comb a little bit of fiber right there at the wheel. The handheld combs fit these situations beautifully. They’re also just the thing for very fine fibers like angora and baby alpaca. Just because they’re shorter and the tines are spaced closer doesn’t make them any less dangerous to use, though. I’ve had some nasty puncture wounds from my mini-combs, usually received when I’ve been trying to work entirely in my lap. I’ve learned the hard way that working next to a table is much safer. Lashing on can be done holding one comb in your less-dominant hand with tines pointed away from you, and combing the fiber on with the dominant hand, much as you do on a stationary comb. Again, don’t fill the comb too full – one-quarter to one-third full is plenty. Put the remaining fiber down and pick up the other comb from the tabletop where it’s lying sideways on top of the case with the tines pointing away from you. That puts the handle right there ready to pick up. Comb carefully, being sure to point the tines away from your body. This gets tricky during demonstrations, and the safety of your audience is another reason to work behind a table. Work mindfully; keep your attention on what you’re doing!
When you’re ready to pull off your top, put the traveling comb back on the holder, lying on the side with tines pointed away. If you can clamp the comb holding your top to the table, so much the better. If not, work slowly and cautiously, holding the comb with teeth pointing away from your body in your less-dominant hand and slowly pulling the fiber off in a strip. I’ve never managed to use a diz successfully on the hand combs, since a diz requires two-handed operation. And holding the comb handle between your knees is far from steady; sooner or later you’ll puncture yourself!
Again, put the combs back into their case the instant you’re finished with them. Even if you have enough sense not to touch them, there’s no guarantee that all of the people and animals around you are equally sensible. Do you have a child or grandchild or neighbor’s child or kitten that likes to jump into your lap? Horrible picture…let’s not go there.
Yes, I’ve seen spinners spin directly from the comb, both mini- and full-size, holding the comb in their lap. It strikes me as an accident, complete with emergency room trip and tetanus booster, ready to happen. But if you don’t mind needles and have good insurance, it’s your decision.
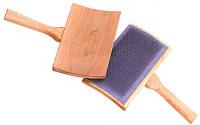
What about hand cards (picture from Schacht website)? They shouldn’t be all that dangerous – they’re basically wire brushes, right? Think again. I got my only fiber-related trip to the emergency room to date from a set of cotton cards. I was using one to flick-card locks of wool. I had a heavy piece of leather on my lap and was working on it. I got up for some reason, came back and sat down at my wheel, picked up a lock and the card, and proceeded to put approximately 100 small puncture wounds of about an inch deep into my thigh just above the knee. I’d forgotten to put the leather on my lap! Of course, I was spinning grease fleece from a freshly-shorn sheep in a public demonstration held in a barn. I didn’t remember when I’d had my last tetanus booster and I was 150 miles from home on a weekend. “Ouch” doesn’t begin to cover it. The doctor was quite blunt; “If you’re going to be fooling around with farm products, keep your tetanus boosters up to date.”
Even when used as designed for carding fiber, you can skin up your hands badly with a set of cards by using them carelessly. Again, give yourself lots of elbow room in an armless chair or on a stool. Set a basket for rolags on one side and a trash can on the other, and put the cleaned fleece within easy reach. Don’t overload the first card, and be careful where you’ve placed the second – put the carding cloth side down unless it’s sitting on a table out of reach of anyone else! Work carefully and mindfully, and as in combing, take frequent breaks with the cards properly secured. A small flick-carder is a wonderful tool for cleaning cards, but it can also take off hide! Secure it just as you do your cards; in a heavy cloth or leather sleeve.
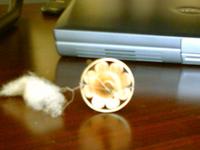
A spindle is a lovely thing, small and useful. The beautifully-turned wooden ones are some of my favorite tools. The metal support spindles are perfect for spinning cotton and other short fibers. Sitting on one you’ve left on a chair, however, isn’t a lovely experience for either you or the spindle. At the least, you’ll break the spindle – at worst, you’ll puncture your tender hide. Make putting tools away in a safe place an unbreakable habit.
Spinning wheels are pieces of machinery. No matter how primitive and pretty they are, they are high-speed machinery. Stick your hand between the spokes on the wheel or in the path of the flyer when treadling, and you’re going to know about it! When you aren’t spinning, secure the drive wheel and flyer. I thread a ribbon between the spokes of my wheel and tie it around the flyer; that way both pieces are fairly immobile. If you don’t have a drive wheel with spokes, just tie the flyer to the mother-of-all.
Since spinning wheels are machinery, they require regular maintenance. If you have a wheel with sealed bearings, that’s one less place you must oil. But the wheel will work more smoothly if you lubricate a few places. Check your owner’s manual. If you bought the wheel second-hand, try this: Lubricate (I use 30-weight motor oil) any place where one part fits into or over another and any place where metal touches wood. I oil my Kromski Symphony every half-hour when spinning, and my Majacraft Rose every hour or so. I also dust and polish both wheels regularly, and tighten any loose nuts or connections as needed. These steps are simple, but they help make spinning a pleasure instead of a chore.
Now the spinning is done and you’re ready to knit. What other dangerous pieces of equipment will you be using? Believe it or not, a swift can be a source of small injuries. You can catch fingers or clothing in the joints, resulting in a painful pinch. If you aren’t careful to keep extra fingers out of the way, you can pinch them when adjusting the swift size to your skein. And you don’t want to get too close to a rapidly-revolving swift – they can give a painful knock to careless fingers or hands.
Before you start to use a ball-winder, be sure the central portion on which the ball of yarn forms is well-seated. Having them fly off is at least a nuisance, and at worst a projectile of odd and unpredictable path.
And now I’ll get to knitting needles. The hazards depend to a large extent on the material from which the needles are made. Plastic or casein isn’t much of a problem unless the needles are stiffened with wire. They’ll bend or break before they cause more than an “Ouch!” Wire-stiffened needles could deliver a painful jab or puncture before they bend.
Bamboo and wooden needles can splinter or break. Those jagged ends can cause real pain. You don’t want to sit on them. Also, unless regularly inspected and polished both bamboo and wooden needles can develop splinters down their length. This is more of a problem with long single-point needles than with shorter lengths. But splinters are never fun, and if you’ve been knitting unwashed wool yarn you again should be sure your tetanus boosters are up to date.
Metal needles are a no-brainer – of course they can hurt! Most of the time they’ll bend, but not before you have quite a bit more than an “Ouch!” to remember the experience.
My children learned early that needles and pins are sharp. Usually through opening the door to my sewing closet despite a ‘child-proof’ lock and the knowledge that the area was off-limits to them. What we sometimes disregard is that all needles and pins are sharp, including tapestry and yarn needles with so-called rounded points. You can get hurt with these simple tools, so treat them with respect.
My last admonition is just as common-sense as those above. Your fiber tools are tools – not toys! Tools should be maintained and stored properly so that they will function properly during use. Storage containers aren’t nearly as expensive as a single trip to the emergency room. Time is never so short that you don’t have enough to put away your tools. If nothing else, you can drop them into a bag and run for the door. Please be safe instead of sorry – your fiber pursuits will be pleasurable, guilt- and pain-free pastimes!
Subscribe to:
Posts (Atom)